Bookings
The Bookings page is where you find, create and manage individual bookings. Use it to look up a customer's booking, take a phone booking, check someone in, change a booking, reply to a customer, or cancel.
Open it from Operations → Bookings in the sidebar. On a phone, it is the Bookings tab in the bottom bar (see Mobile admin app).
Related pages under Operations: Cancellations and No-Shows (both covered below), Waitlist, Booking groups and Refunds (see Payments and refunds).
Find a booking
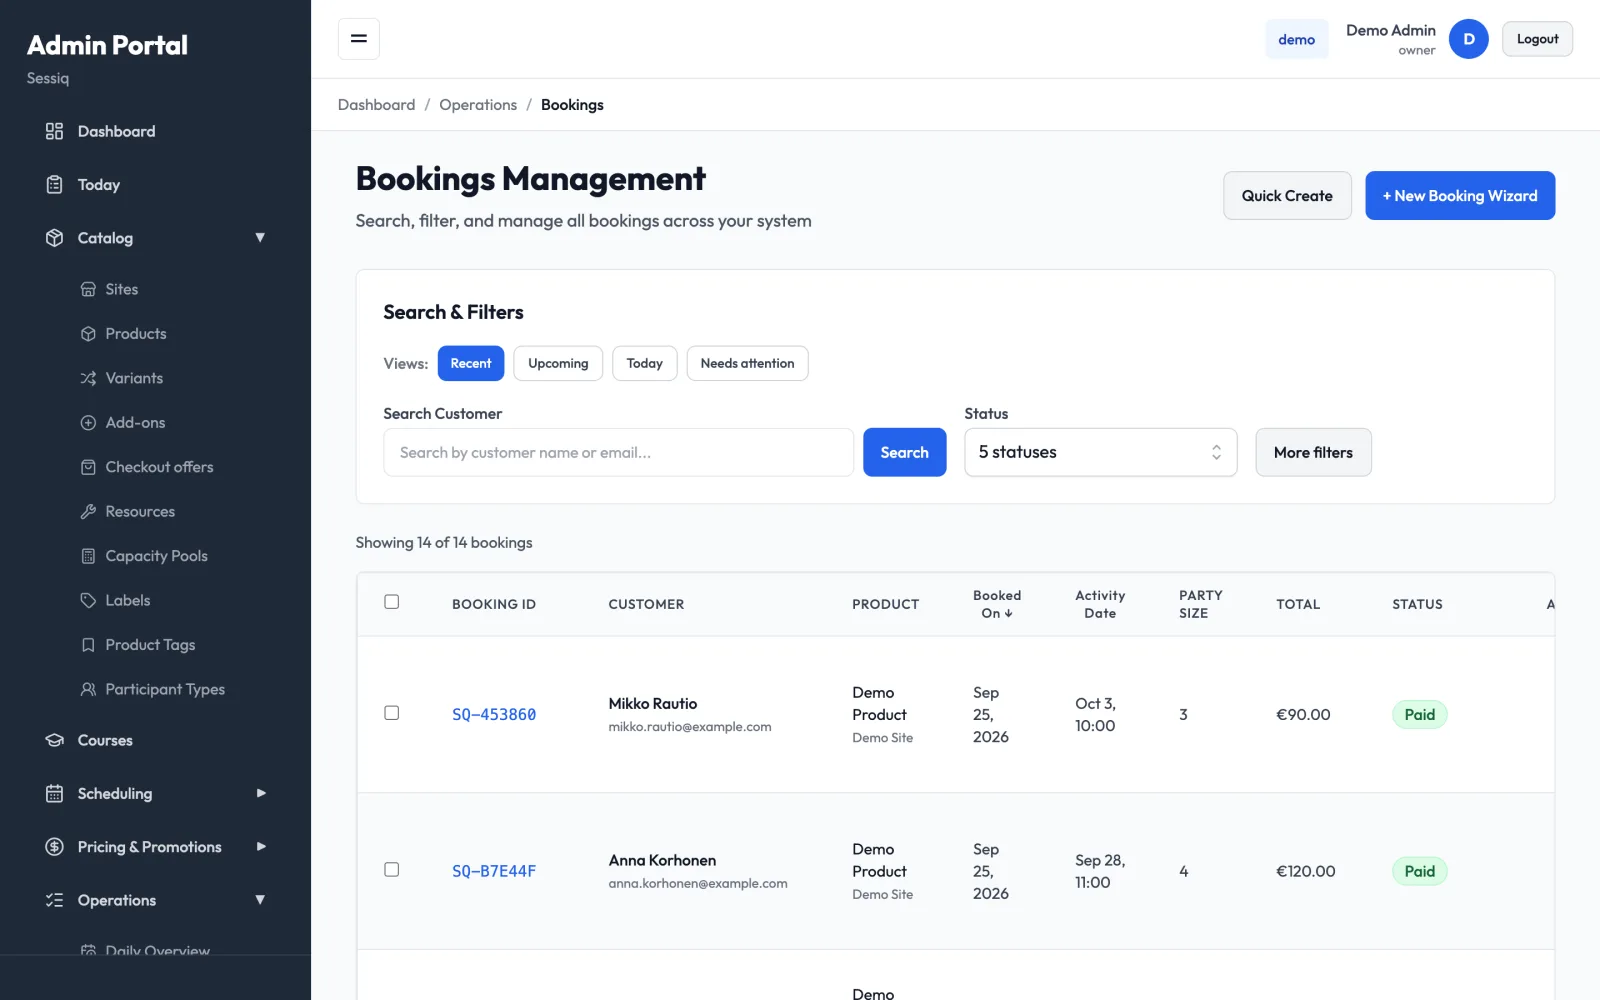
Views
The Views buttons are one-click shortcuts. Each one sets the sort order, dates and status filter for you:
| View | Shows |
|---|---|
| Recent | Newest bookings first, by the date they were made. This is the default. |
| Upcoming | Bookings from today onwards, soonest activity first. |
| Today | Only today's bookings, in start-time order. |
| Needs attention | Unsettled bookings: holds that aren't confirmed yet, and completed bookings that aren't fully paid. |
If you change a filter by hand, no view button is highlighted.
Search and filters
- Search Customer: type part of a customer's name or email and press Search.
- Status: pick one or more statuses. By default every status is selected except Cancelled and Expired, so the list isn't cluttered with bookings that no longer matter. Tick them to show them again. Two special options sit at the end of the list: Unpaid completed and Unsettled (holds + unpaid). Each of them replaces any other status you had selected.
- More filters opens From Date, To Date, Site and Product. The button shows how many of these are in use, even when the panel is closed. Clear Filters resets them.
Your filters are kept in the page address, so you can bookmark a view or send the link to a colleague.
The bookings table
The table shows 20 bookings per page. The columns are Booking ID, Customer (name and email), Product (with the site underneath), Booked On, Activity Date, Party Size, Total and Status. Click Booked On or Activity Date to sort by that column; click again to reverse the order.
Click a row to open the booking. The Actions column has quick buttons so you don't have to open it:
- Confirmed bookings: Arrived, No-Show and Cancel.
- Arrived bookings: Mark Completed.
- Bookings on hold: Cancel.
Each quick action asks you to confirm first.
Booking status
Every booking has two separate statuses:
- Lifecycle status: where the visit is. The values are Hold, Confirmed, Arrived, Completed, Cancelled, No Show and Expired. The Status filter uses these.
- Payment status: whether the money is settled (unpaid, deposit paid, paid or refunded).
The badge you see in the table and on the booking combines the two into one label:
| Badge | Meaning |
|---|---|
| On Hold | Seats are reserved while the customer finishes checkout. Not confirmed yet. |
| Paid | Confirmed and paid in full. |
| Deposit Paid | Confirmed, with a deposit paid and a balance still due. |
| Pay at Arrival | Confirmed but not paid. Collect payment when the guests arrive. |
| Free | Confirmed, and nothing is owed (for example, a complimentary booking). |
| Arrived | The guests have checked in. |
| Completed | The visit is over and the booking is paid. |
| Completed — Unpaid | The visit is over but money is still owed. Follow it up. |
| Cancelled | Cancelled, or fully refunded. |
| No Show | The guests didn't turn up. |
| Expired | A hold that ran out before it was confirmed. |
Create a booking
There are two buttons at the top of the page.
- + New Booking Wizard is the one to use for phone, email and counter bookings. It guides you through every choice.
- Quick Create is a short form for staff who already know the exact slot. It asks for Site, Product, Variant, Slot ID and Party Size, and creates a hold. From there you can Confirm Hold or View Booking.
For customers standing at the counter, the Quick walk-in screen is faster than either.
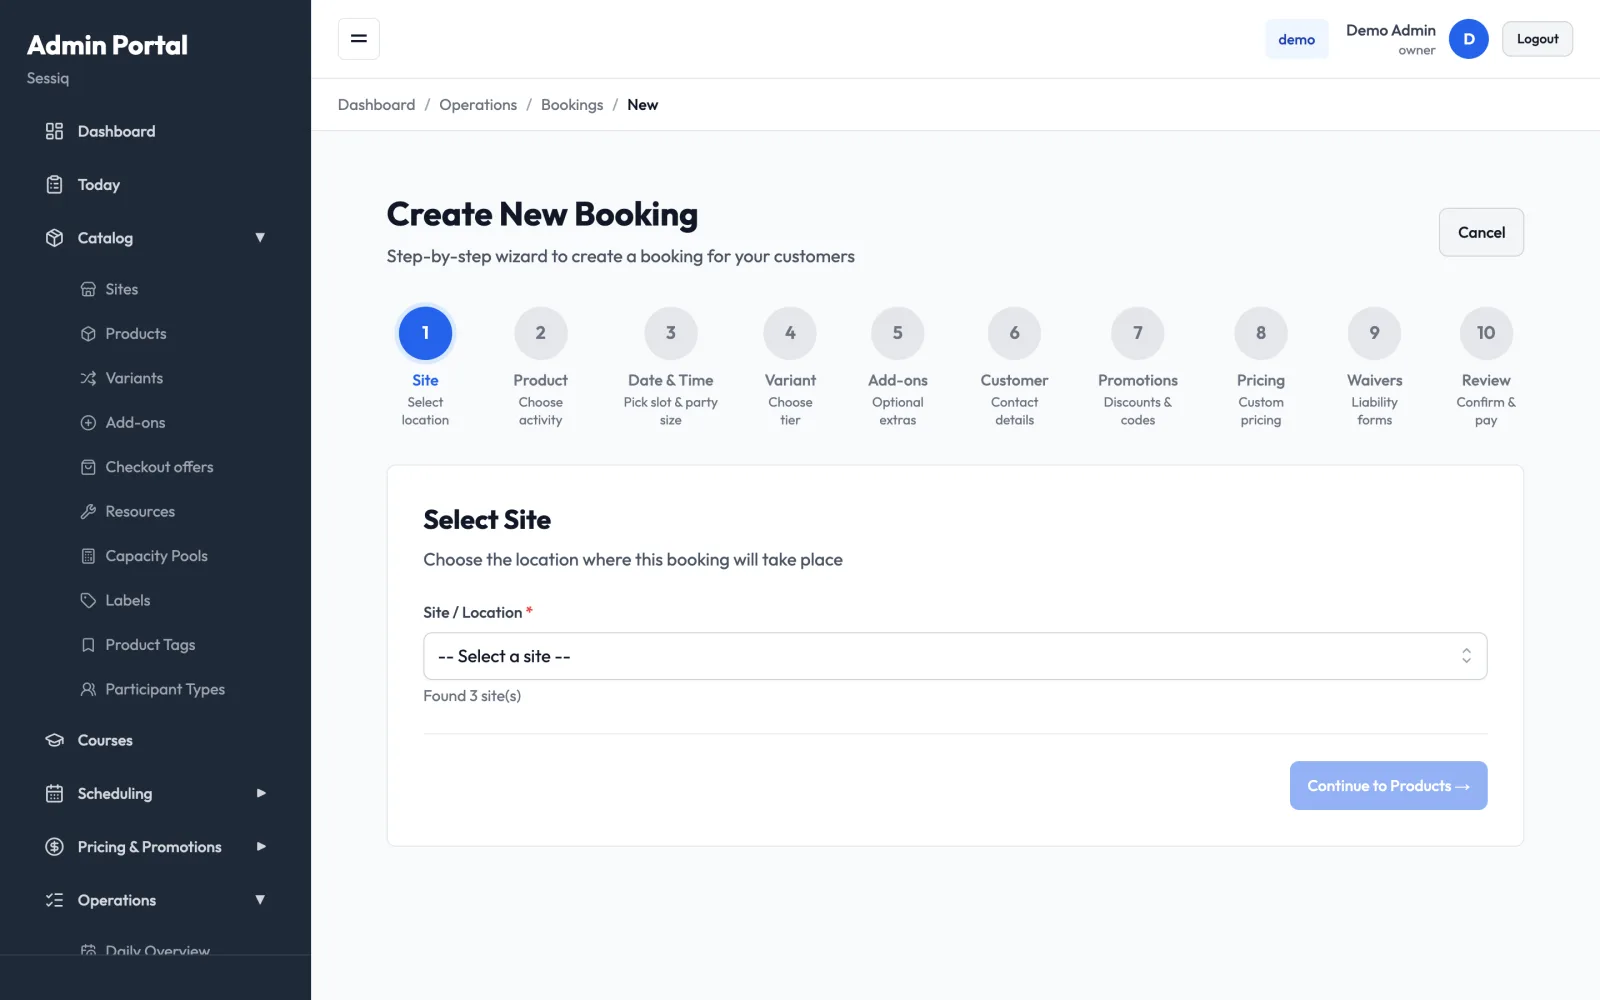
The New Booking Wizard
The wizard has ten steps:
-
Site: choose the location.
-
Product: choose the activity.
-
Date & Time: pick a slot. If the product uses participant types (such as adults and children), enter how many of each; otherwise enter the party size.
-
Variant: choose the tier. This step is skipped when the product has no variants.
-
Add-ons: add optional extras.
-
Customer: enter Customer Name, Email Address, Phone Number (Optional) and any Special Requests or Notes. Email can be left out for walk-in and phone bookings; the customer then gets no confirmation email.
-
Promotions: apply a Promotion Code or redeem a Voucher / Gift Card code. The wizard places a hold on the slot at this step so the discount can be checked. Press Skip if there's no code.
-
Pricing: to charge a different amount, turn on Override pricing, enter a Custom total and give a reason. Leave it off to use the normal price.
-
Waivers: only matters if the product needs a waiver. You can Accept Waiver on Behalf of Customer (say how consent was given, for example by phone), mark it Collected Offline (paper form), or Skip Waiver Requirement with a reason. The booking can't be confirmed until the waiver is handled one way or another.
-
Review: check the summary and choose the Booking Source (Walk-in, Phone or Online (admin-assisted)) and the Payment Method:
- Pay on Arrival: the customer pays when they arrive.
- Send Payment Link: the customer gets an email link to pay online. The booking stays unpaid until they do.
- Complimentary: a free booking, with nothing owed.
- Invoice: you invoice the customer yourself. The booking stays unpaid and is flagged for follow-up.
- Cash (counter) and Card (counter terminal): only offered for walk-in and phone bookings. They mark the booking paid.
Under Admin Options, pick a Booking Created Reason, add Internal Notes (Optional) if you like, and tick the box confirming the customer has agreed to the terms. Then press Confirm Booking. You are taken to the new booking.
Cancel at the top leaves the wizard. Everything you entered is lost.
The booking page
Click any booking to open it. The badge at the top right shows its combined status.
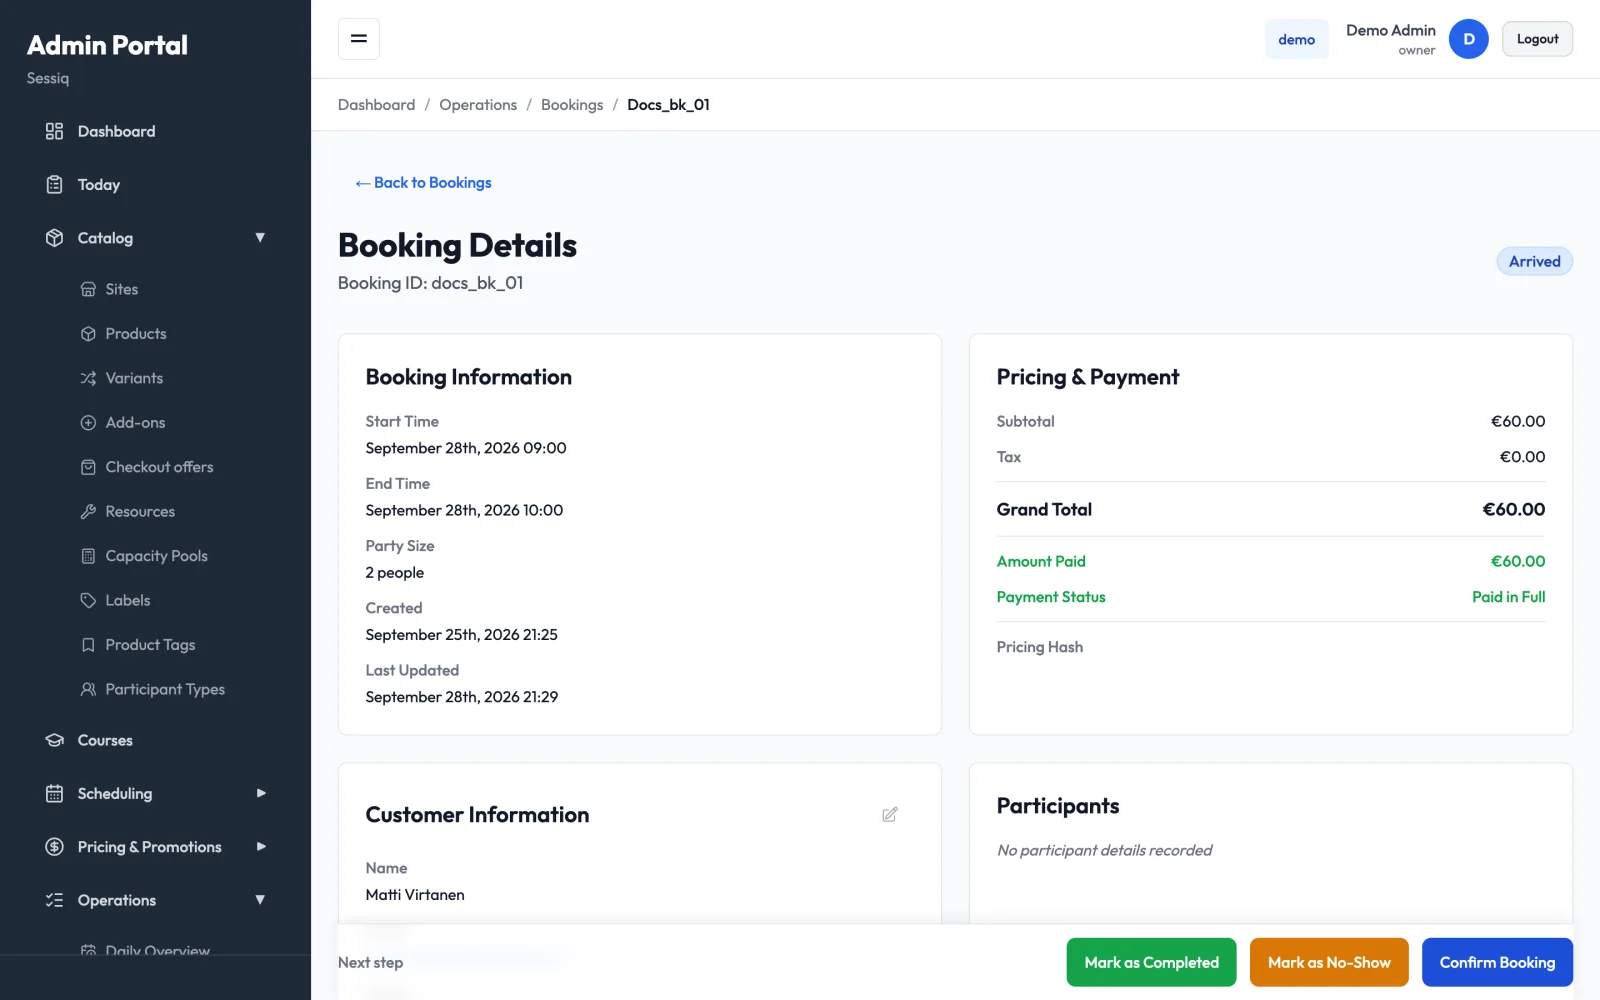
The page is made up of cards:
- Booking Information: start and end time, party size, and when the booking was created and last updated.
- Pricing & Payment: subtotal, any discount, promotion or gift card, tax, Grand Total and Amount Paid. If money is still owed, the Outstanding Balance is shown with a Mark as paid button. Use it to record a payment taken at the desk, choosing the payment method and amount.
- Customer Information: name, email and phone. Click the pencil icon to correct them. This works on every booking, including finished ones.
- Participants: the people in the party, if their details were collected.
- Booking Contents: the add-ons on the booking.
- Price Adjustment History: every price change made to the booking. You can reverse an adjustment here, giving a reason.
- Message Log, Admin Actions, refunds and Internal Notes: described below.
Next step
A Next step bar stays at the bottom of the screen. It shows only the status changes that make sense right now. For a confirmed booking, these are:
- Mark as Arrived: the guests are here. Add Arrival Notes (Optional) if useful and click Confirm Arrival. For a pay-on-arrival booking, the dialog also shows the Amount Due. Keep Collect payment now ticked and pick the Payment Method (Cash, Card or POS) to record the payment; untick it to leave the booking in Payment Pending. If the guest pays with a gift card, click Redeem it at the gift card desk under Paying with a gift card?. The desk opens in a new tab with the site, the amount due and the booking reference filled in, and the dialog stays open. See Redeem at the front desk.
- Mark as Completed: the visit is done. If money is still owed, you choose between Complete and collect payment and Complete only.
- Mark as No-Show: the guests didn't come. You can apply a no-show fee as a percentage of the booking total, and add notes. The customer is notified.
- Cancel Booking: see Cancel a booking.
For a hold, Confirm Booking confirms it, and the customer gets a confirmation email. Some buttons are corrections. For example, on an arrived booking Confirm Booking undoes a check-in made by mistake. Hover over a button to see what it does.
Walk-in and phone bookings can't be marked as no-shows.
Admin Actions
The Admin Actions card has the rest of the tools:
- Adjust Price: apply a Discount, Surcharge, Comp (Complimentary) or Correction, as a fixed amount or a percentage, with a reason. Not available once a booking is finished or cancelled.
- Resend Confirmation Email: sends the confirmation again. Tick Send to a different email address to send it somewhere else.
- Resend Payment Link: shown when money is still owed. It emails the customer a link to pay online.
- Edit Booking:
- Reschedule: pick a new date and time. Any reschedule fee is shown. Add a reason for the record. Admin overrides let you Waive reschedule fee, Skip policy checks or Force capacity (overbook the new slot). You can only reschedule future bookings that are on hold or confirmed.
- Change party size: the price and capacity are recalculated. If the slot is full, you can choose to overbook.
- Edit Participants: correct names and details for each person. This still works after the visit, so you can fix names on past bookings.
- Manage Add-ons: add or remove extras on upcoming bookings.
To refund money, use the refund section on the booking page. See Payments and refunds.
Internal notes
Internal Notes are for staff only. Customers never see them. Press Add Note, pick a category (Billing, Operations, Customer Service or Internal) and write the note. You can Pin important notes to the top, Flag notes that need follow-up, and edit or delete notes later. Use the category tabs to filter the list.
Messages with the customer
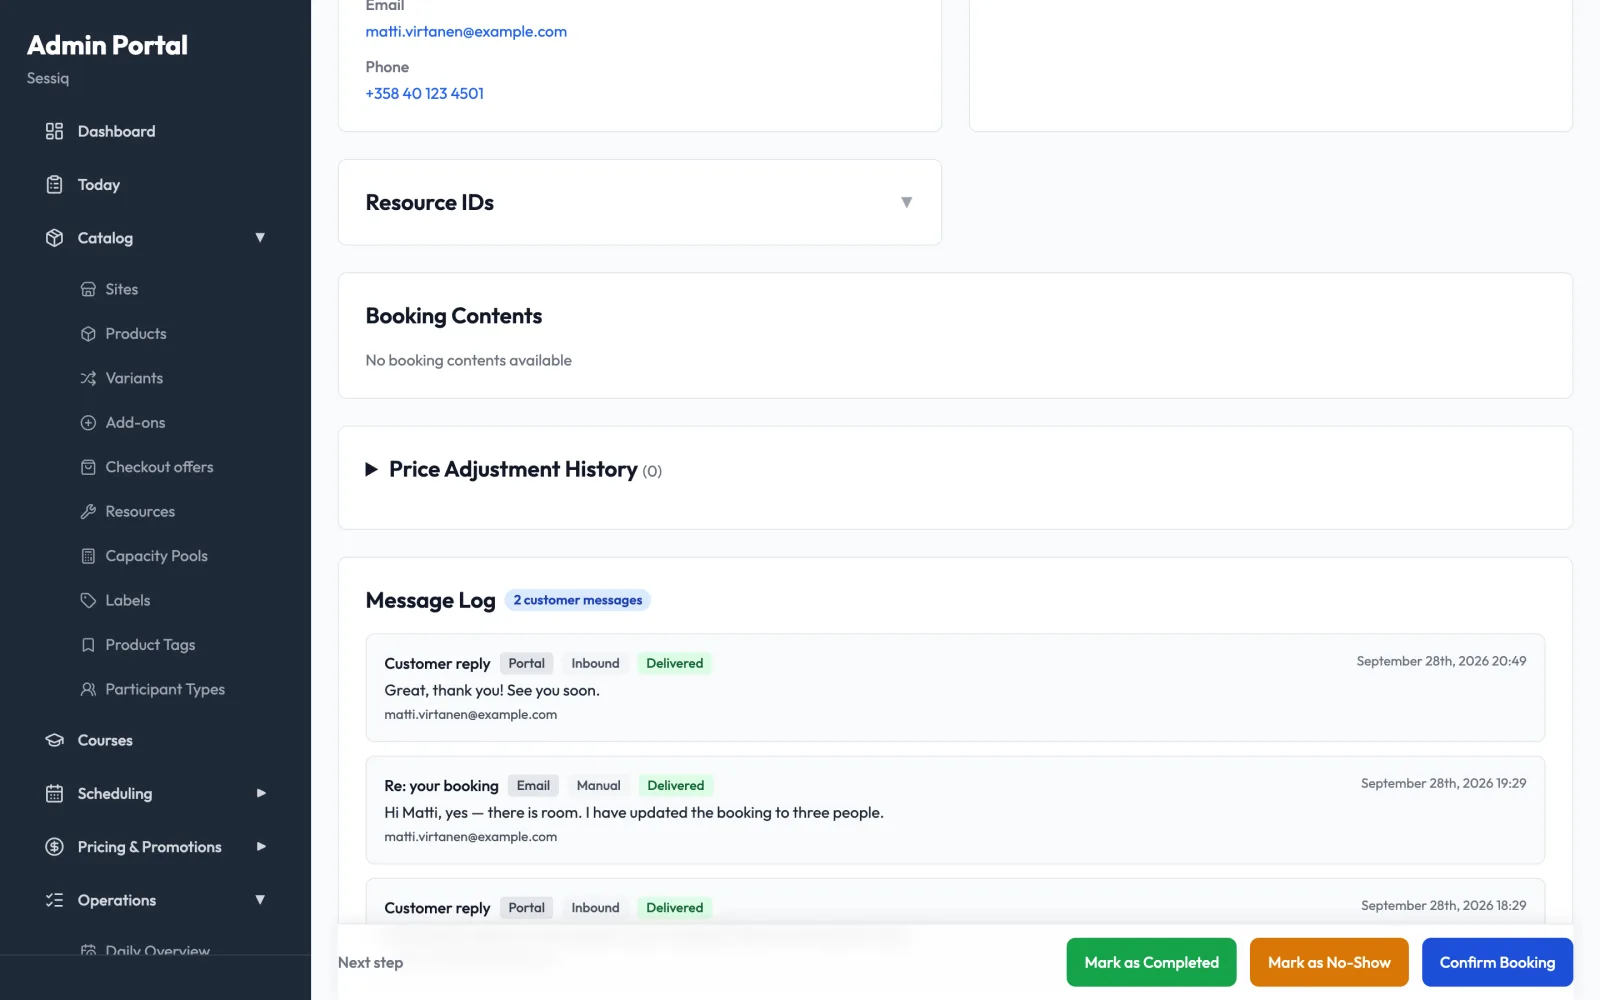
The Message Log shows every message about the booking in one place: automatic emails (confirmation, reminder, payment link, reschedule notice and so on), messages staff have sent, and replies from the customer. Each entry shows the channel (Email, SMS, Push or Portal), where it came from (Automated, Manual or Inbound) and its delivery status.
Customers can send you a message from their booking page. These show up as Customer reply with the Portal channel. The badge next to the title counts the customer messages on the booking.
To answer, type in Reply to customer and press Send reply. The reply goes to the customer's email address and is added to the log. If the booking has no email address, you can't reply from here.
Cancel a booking
Cancel from the Next step bar on the booking, or with Cancel in the bookings table.
- Choose a Cancellation Reason and add Additional Notes (Optional).
- If the customer has paid, Initiate Refund is ticked for you. Leave it ticked to refund automatically. Complimentary bookings have nothing to refund.
- Press Cancel Booking. The customer gets a cancellation email.
If you untick Initiate Refund on a paid booking, you're asked to confirm Cancel without refund and give a reason. That decision is recorded for your finance team. If the payment provider rejects the refund, the booking is still cancelled, and a warning tells you to sort out the refund by hand.
A booking that has already started can't be cancelled. The exception is a course enrollment: once its first session has started, Cancel on the booking opens Withdraw from course instead (see Courses).
In the bookings table, Cancel on a hold only asks you to confirm. There is no reason or refund step, because nothing has been paid.
Cancelling can't be undone.
Cancel several bookings at once
Tick the boxes in the bookings table and press Bulk Cancel. Choose a reason, add internal notes, and decide whether to Send cancellation notification to customers and Automatically process refunds for paid bookings. Press Preview Cancellation to see which bookings can be cancelled and the total to refund, then confirm. The results screen lists any bookings that failed.
The Cancellations page
Operations → Cancellations lists cancelled bookings. You can filter by site, search by booking ID, name or email, and narrow by Cancelled From / Cancelled To. The totals at the top show Total Cancelled, Total Refunded and Average Refund. Each row shows the original date, when the booking was cancelled, the amount paid, the refund and the reason. View Details opens the booking.
No-shows
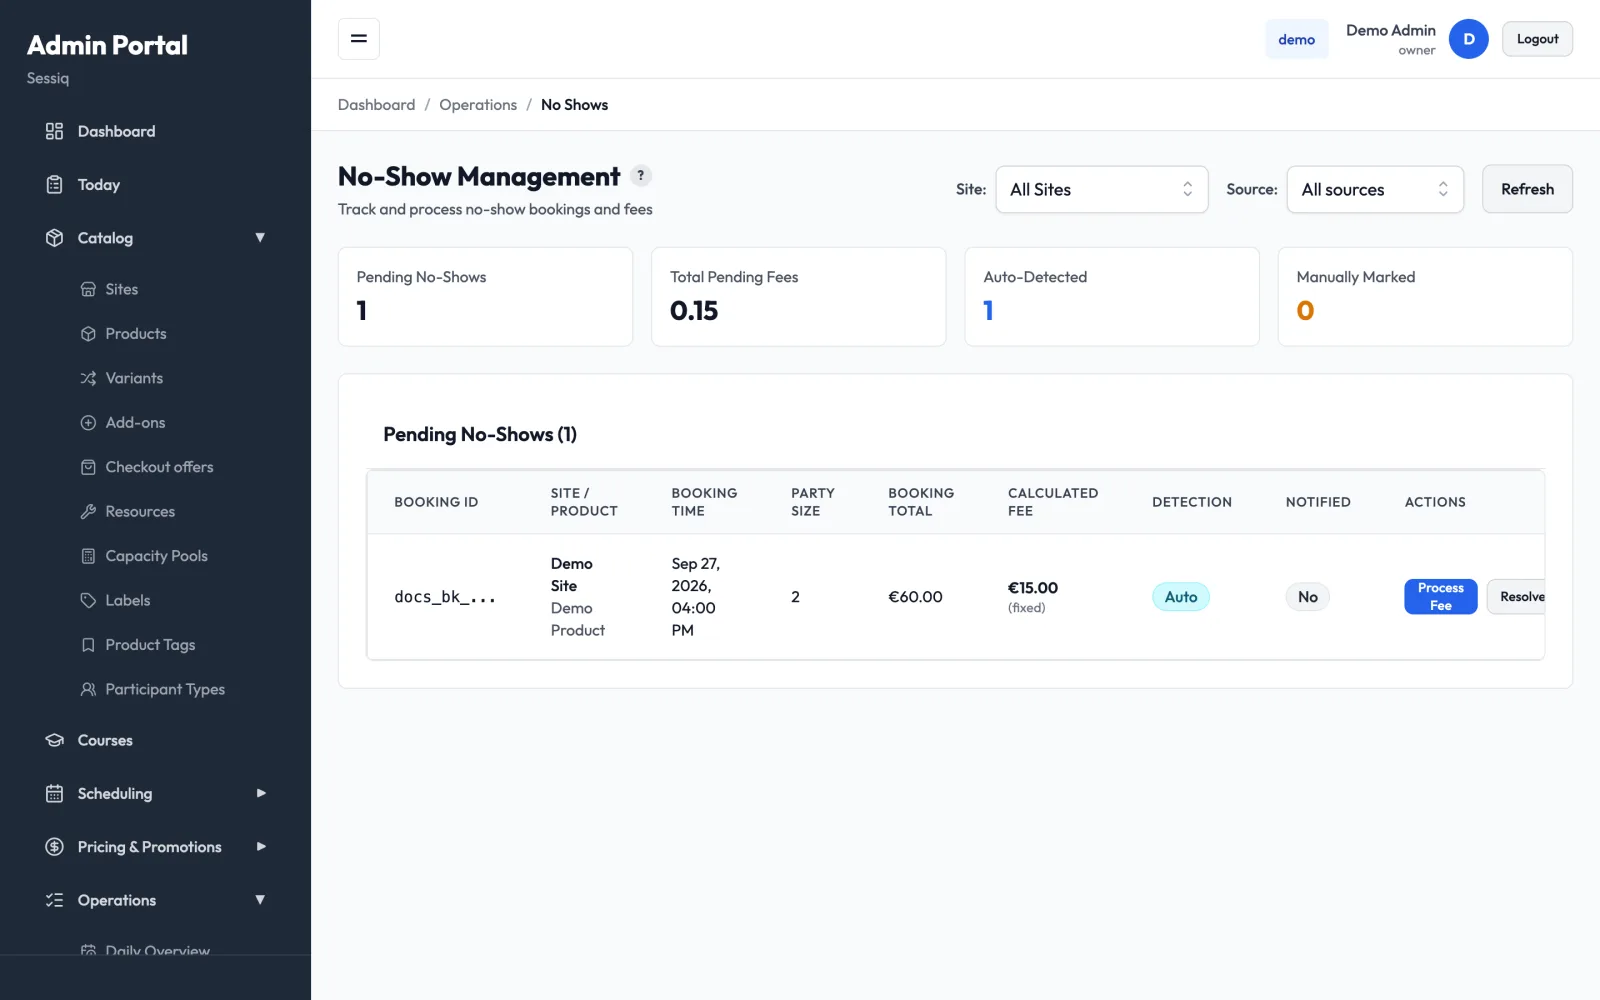
Operations → No-Shows lists no-shows that haven't been dealt with yet. A booking lands here when staff mark it as a no-show, or when the system detects it automatically (Auto or Manual in the Detection column). Filter by Site or Source. Walk-in and phone bookings never appear, because they can't become no-shows.
For each no-show:
- Process Fee shows how the fee was worked out from your no-show policy. Choose Charge Immediately to charge it now, and Notify Customer to email the customer about it.
- Resolve closes the no-show without charging, with optional Resolution Notes (for example, "fee waived").
Customers
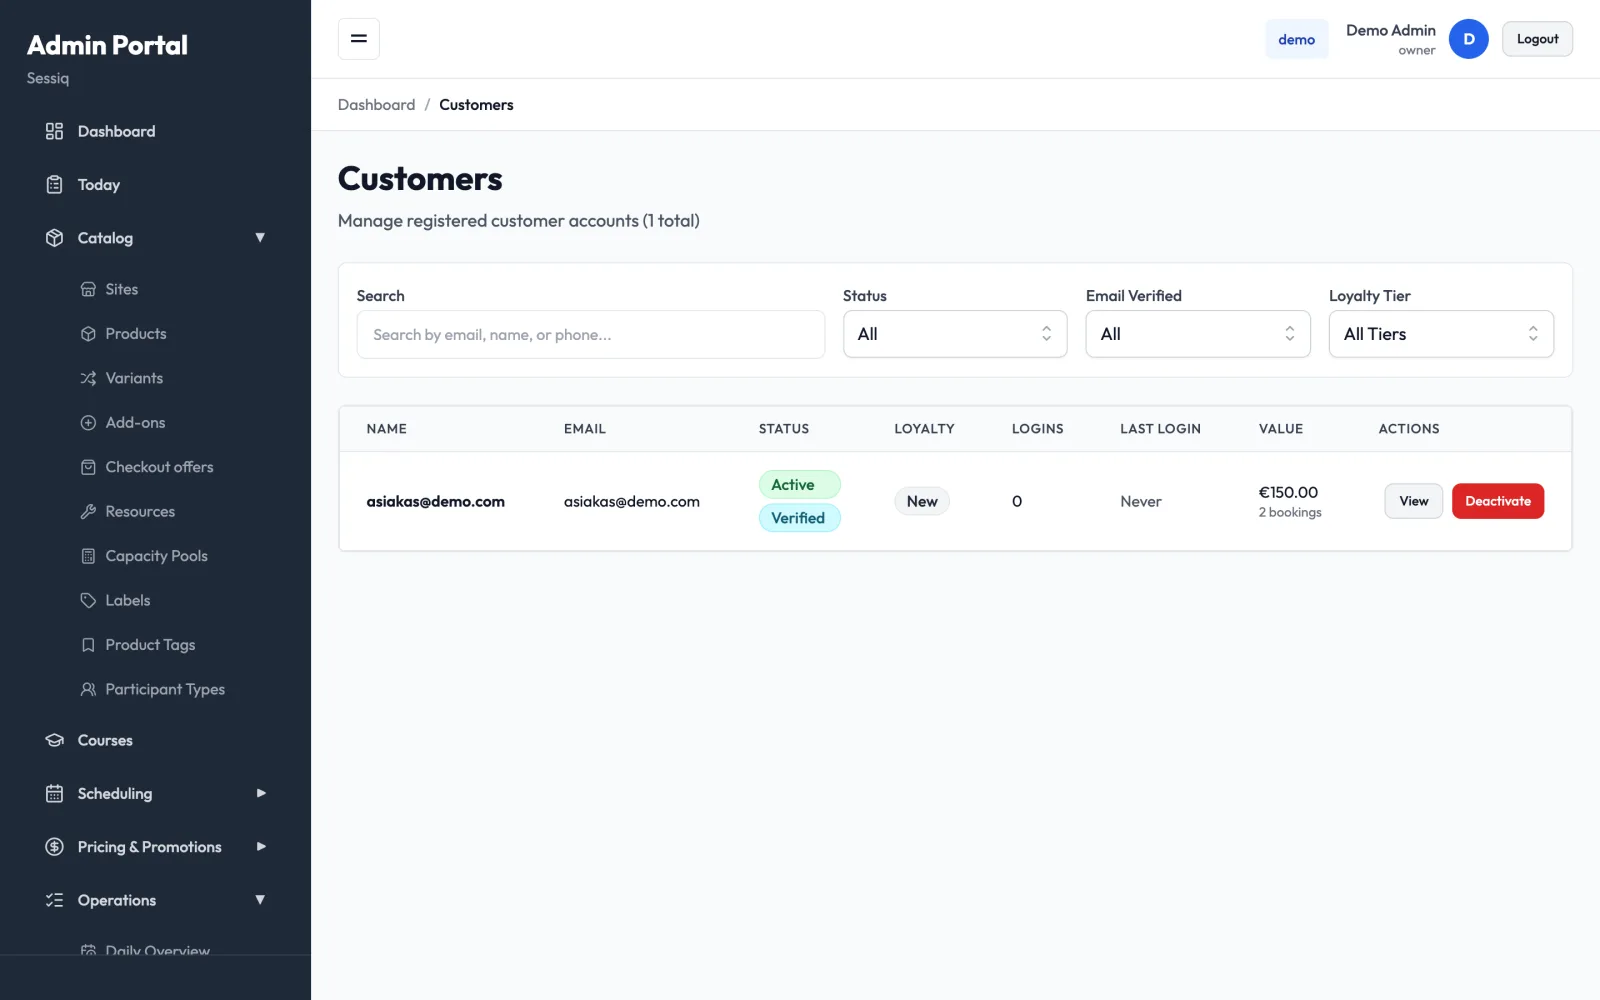
The Customers page in the sidebar lists customers who have created an account. Guests who booked without an account aren't listed; you find their bookings by searching on the Bookings page.
Search by email, name or phone, and filter by Status, Email Verified and Loyalty Tier. View opens the customer's profile, preferences, activity, statistics (total bookings, lifetime value, no-show rate) and recent bookings. From there you can also verify the email or unlock a locked account. Deactivate stops the account from being used; Activate turns it back on.
Tips
- Use Needs attention at the end of the day to catch holds that weren't confirmed and visits that weren't paid.
- When a customer phones, search by their email first. It's the most reliable way to find their booking.
- Write down anything unusual in Internal Notes, so the next person on shift knows about it.