Payments and Refunds
This page covers the money side of a booking: reading a booking's payment status, recording payments taken at the venue, refunding customers, adjusting prices and giving comps, and checking that your payment provider's records match Sessiq's.
Most of this work happens on the booking detail page (Operations → Bookings, then open a booking). The Refunds list, the Reconciliation report and the Comp Activity report give you the overview across all bookings.
Payment statuses
Every booking has a status badge that combines where the booking is (held, confirmed, arrived, completed…) with whether it has been paid. The badges you will see are:
| Badge | What it means |
|---|---|
| On Hold | The customer is still in checkout and has not paid yet. Unpaid holds expire automatically. |
| Paid | Confirmed and paid in full. |
| Deposit Paid | Confirmed with a part payment (for example a deposit). The rest is still owed. |
| Pay at Arrival | Confirmed, but nothing has been paid yet. You collect the payment at the venue. |
| Free | Confirmed and the total is zero, so nothing is owed. |
| Completed | The visit is done and the booking is paid (or was free). |
| Completed — Unpaid | The visit is done but money is still owed. Record the payment to clear it. |
| Cancelled | Cancelled. A confirmed booking that has been refunded in full also shows as Cancelled. |
On the booking detail page, the payment summary also shows one of these lines:
- Outstanding Balance — how much is still owed, with a Mark as paid button when a payment can be recorded.
- Paid in Full — nothing is owed.
- Overpayment / Credit — the customer has paid more than the total.
- Payment Status: Refunded — the payment has been returned to the customer.
For check-in states (Arrived, No Show, Expired) see Bookings.
Recording a payment taken at the venue
When a customer pays at the counter, record it so the booking stays in sync.
- Open the booking and click Mark as paid next to the outstanding balance. For a booking that already has a deposit, the action is called Record Final Payment.
- In Add Payment, check the Grand Total, Already Paid and Outstanding amounts.
- Choose the Payment Method: Cash, Credit Card, Debit Card, Bank Transfer, Mobile Payment, or Other (paid at till).
- Optionally enter a Transaction ID from your card terminal, and adjust the Payment Amount if the customer pays only part of the balance. You cannot record more than the outstanding amount.
- Add any Notes and click Add Payment.
If you click Mark as Completed on a booking that still has a balance, Sessiq asks how to close it out. Choose Complete and collect payment to go straight into the payment form, or Complete only to record the payment later.
To let the customer pay online instead, use Resend Payment Link in Admin Actions. It appears on active bookings that still have an outstanding balance.
Refunding a booking
The Refunds section on the booking detail page shows three totals: Total Paid, Total Refunded and Refundable (what is left to refund). Below them is the booking's refund history, with each refund's status (Pending, Processing, Completed or Failed) and type (Full, Partial or Adjustment).
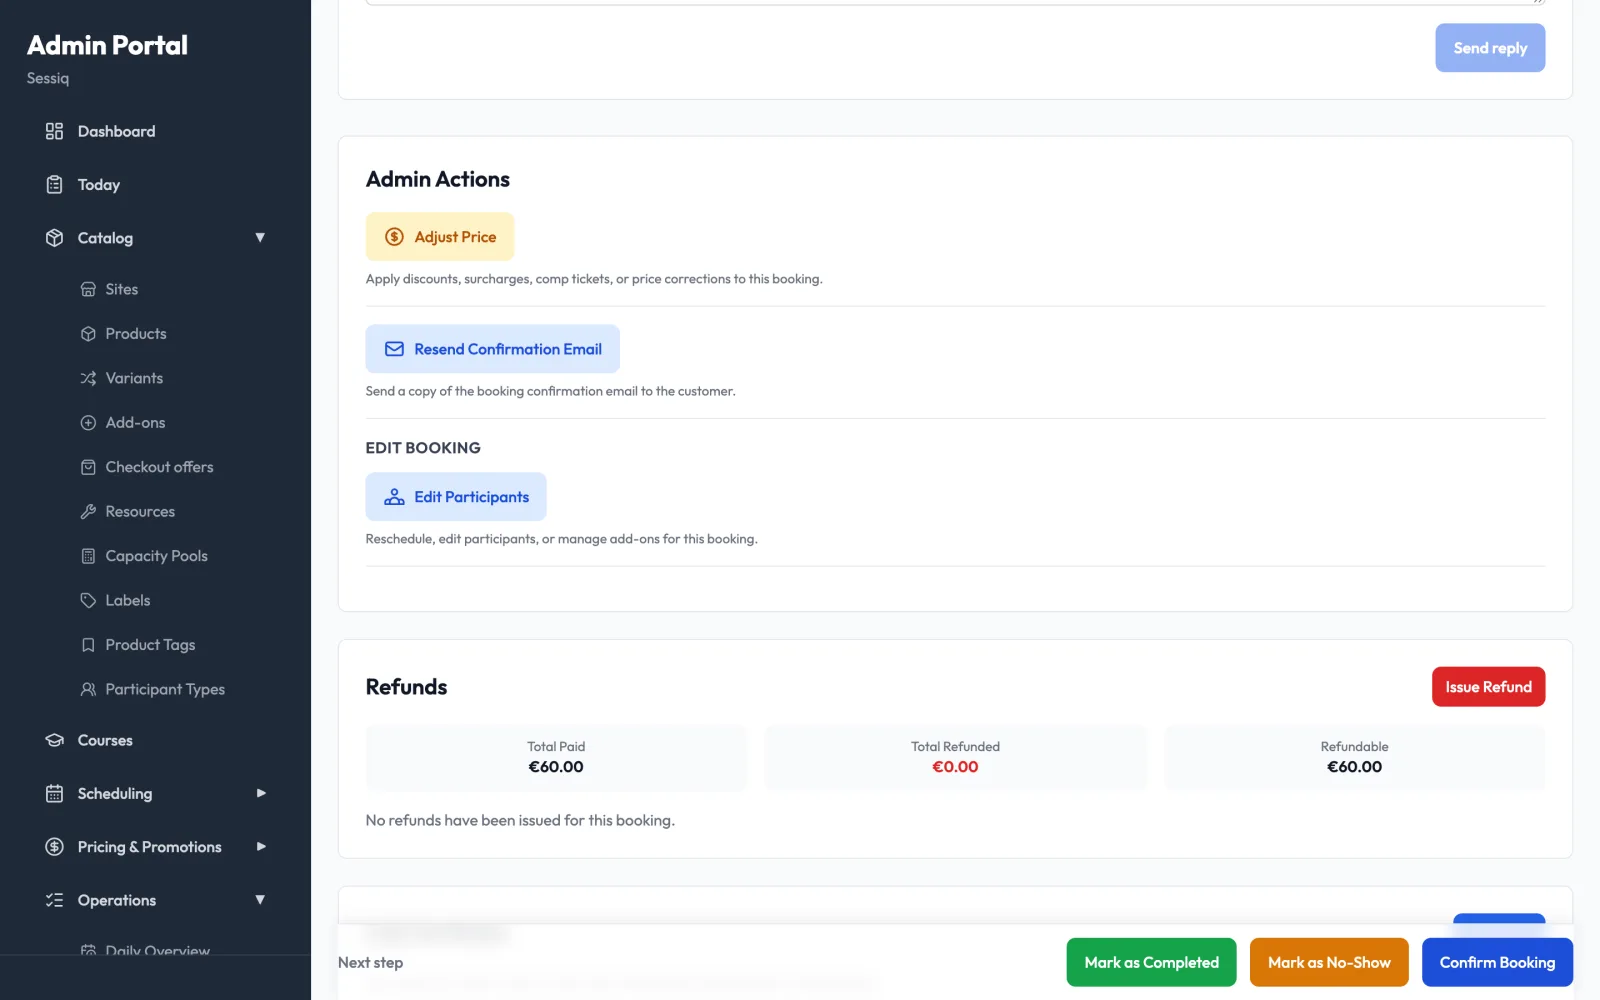
Refunding an online payment
- Click Issue Refund.
- Under Refund Type, choose Full Refund (the whole refundable amount) or Partial Refund and enter the Amount.
- Enter a Reason. This is required.
- Optionally add Internal Notes. Customers never see these.
- Click Process Refund.
The money is returned through the payment provider the customer originally paid with. The refund shows in the history, and the totals update.
Recording a cash or card-terminal refund
If the customer originally paid in cash or on your own card terminal, Sessiq cannot send the money back for you. The Refunds section then shows a Cash refund — handled at counter or Card refund — handled at counter label instead of Issue Refund.
- Give the money back at the counter.
- Click Record manual refund.
- Check the Amount, enter a Reason, and click Record refund.
Refunding when you cancel
When you cancel a paid booking, the cancel dialog can refund the customer at the same time with Initiate Refund. If you choose not to refund, you must confirm Cancel without refund and give a reason, which is logged for finance review. See Bookings for the full cancellation flow.
Only team members with permission to process refunds see the Issue Refund and Record manual refund buttons. See Team and roles.
The Refunds list
Operations → Refunds lists every refund across your bookings.
- Filters: search by booking ID, customer name, email or product; filter by Refund Status (Completed, Pending, Failed); and limit to a Date From / Date To range.
- Totals: Total Refunds, Total Amount, Pending Refunds and Average Refund for the filtered list.
- Table: booking, customer, product, booking date, Amount Paid, Refund Amount, Refund %, status and Processed At. Click View Details to open the booking.
A refund that stays Pending or turns Failed is worth checking in your payment provider's dashboard.
Adjusting a price
Use Adjust Price in the booking's Admin Actions to change what the customer owes. It is available until the booking reaches a final state (such as completed or cancelled).
- Click Adjust Price.
- Choose the Adjustment Type:
- Discount — lower the price, for example a loyalty discount.
- Surcharge — add to the price, for example a late fee.
- Comp (Complimentary) — give the booking away, fully or partly.
- Correction — fix a wrong price.
- Choose the Amount Type: a fixed amount or a Percentage (%) (up to 100).
- Enter the Amount and a Reason (required). Admin Notes are optional and internal.
- Check the preview line ("Will apply … of …") and click Apply Adjustment.
Every adjustment is listed under Price Adjustment History on the booking, with who applied it and the Net adjustment. To undo one, click Reverse this adjustment, give a Reversal reason, and confirm with Reverse.
Adjusting the price does not move money by itself. If the customer has already paid and the price goes down, issue a refund for the difference.
Reviewing comps
Comped bookings are not counted as revenue. To see what was given away, open Reports → Revenue: the Value Comped card shows the total for the period. Click View comp activity → to open the Comp Activity report.
Pick a Start date and End date to list every complimentary booking in that period, with Comped at, Customer, Site, Source, List price, Comped by and Reason. See Reports for the other revenue reports.
Reconciling with your payment provider
Reconciliation compares Sessiq's payment records with your payment provider's records for one day and flags anything that doesn't match. Open Reports → Reconciliation.
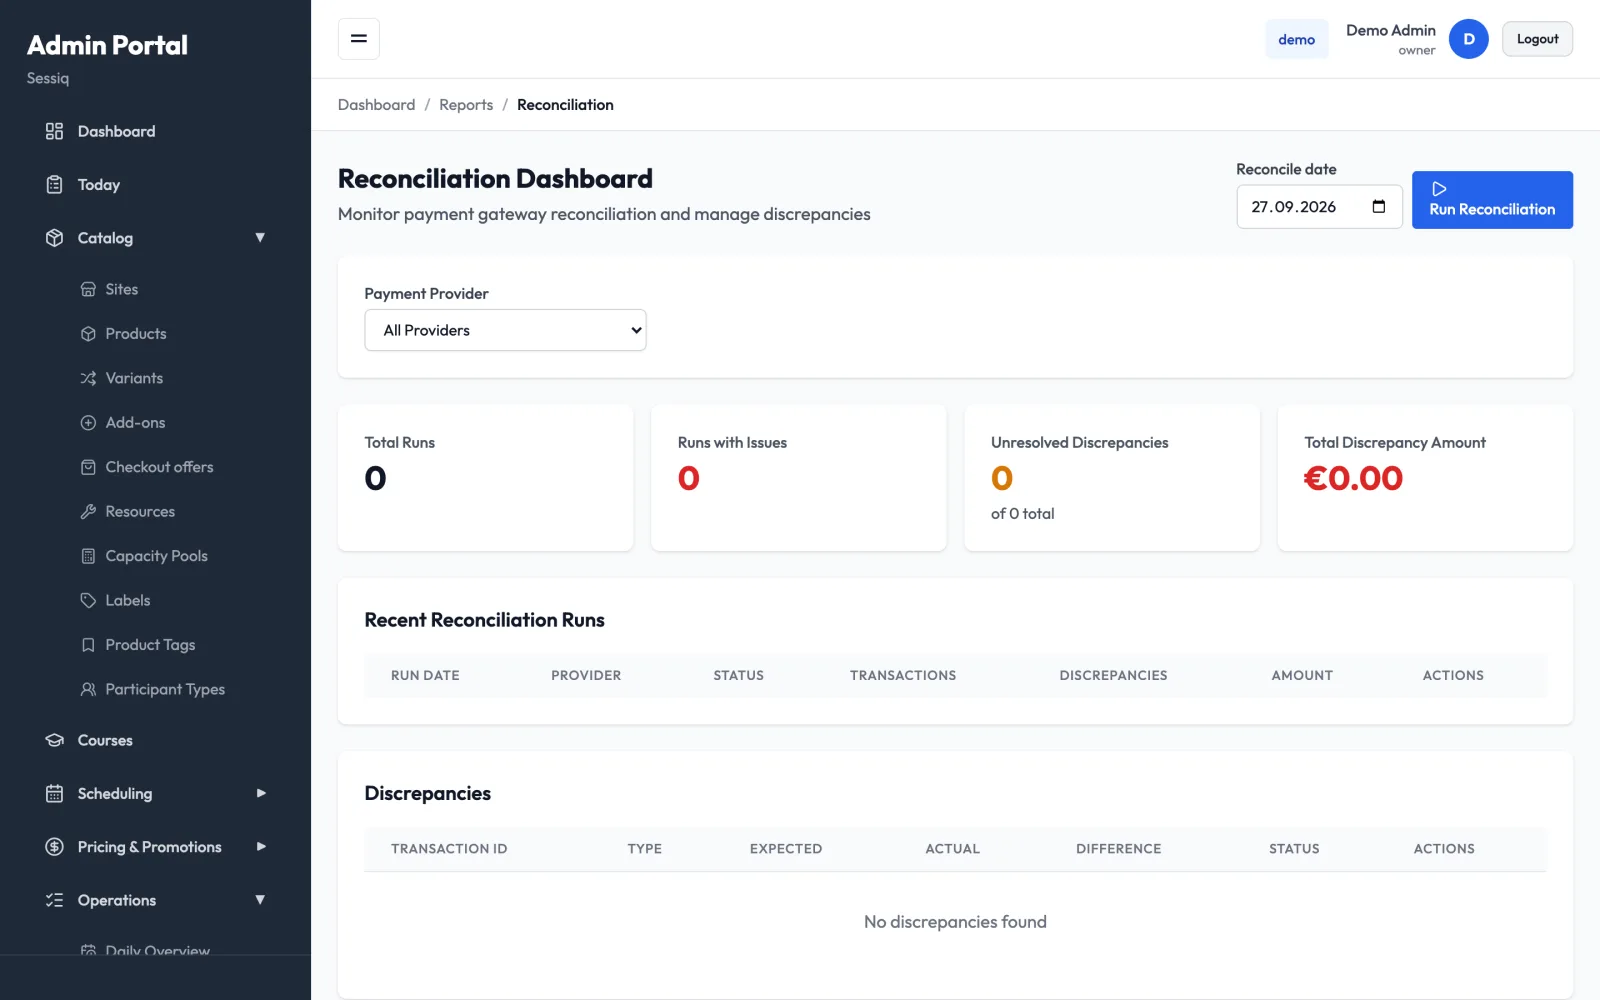
Running a reconciliation
- Pick the Reconcile date. It defaults to yesterday, so you don't check a day whose payments are still settling.
- Optionally choose a Payment Provider. With All Providers, each provider is checked in turn.
- Click Run Reconciliation.
The summary cards show Total Runs, Runs with Issues, Unresolved Discrepancies and the Total Discrepancy Amount. Each run appears in Recent Reconciliation Runs with its status: Reconciled, Discrepancies, Pending or Failed.
Resolving discrepancies
Click View Details on a run to list its discrepancies. Each one has a type:
- Missing Payment — a payment exists on one side but not the other.
- Amount Mismatch — both sides have the payment, but the amounts differ.
- Duplicate — the same payment appears more than once.
For each pending discrepancy:
- Investigate it in your payment provider's dashboard and on the booking.
- Click Adjust.
- Choose the Action: Resolve - Mark as corrected once you have fixed the underlying problem, or Ignore - Accept discrepancy if the difference is expected.
- Add Notes explaining what you found, and click Save Adjustment.
The discrepancy then shows as Resolved or Ignored.
Run reconciliation regularly, for example every morning for the previous day. Small daily checks are much easier to untangle than a month of mismatches.
Related pages
- Bookings — booking detail, cancellations and check-in states
- Walk-in sales — taking payment at the counter
- Gift cards
- Reports — revenue and comp reporting