Emails and automations
Sessiq sends booking emails for you: confirmations, cancellations, reschedule notices, reminders and follow-ups. Two pages control them, both under Communications in the admin menu:
- Email Templates decide what each email says, in each language.
- Automation Rules decide when an email is sent, and for which sites and products.
Only owners and admins see the Communications section.
Email templates
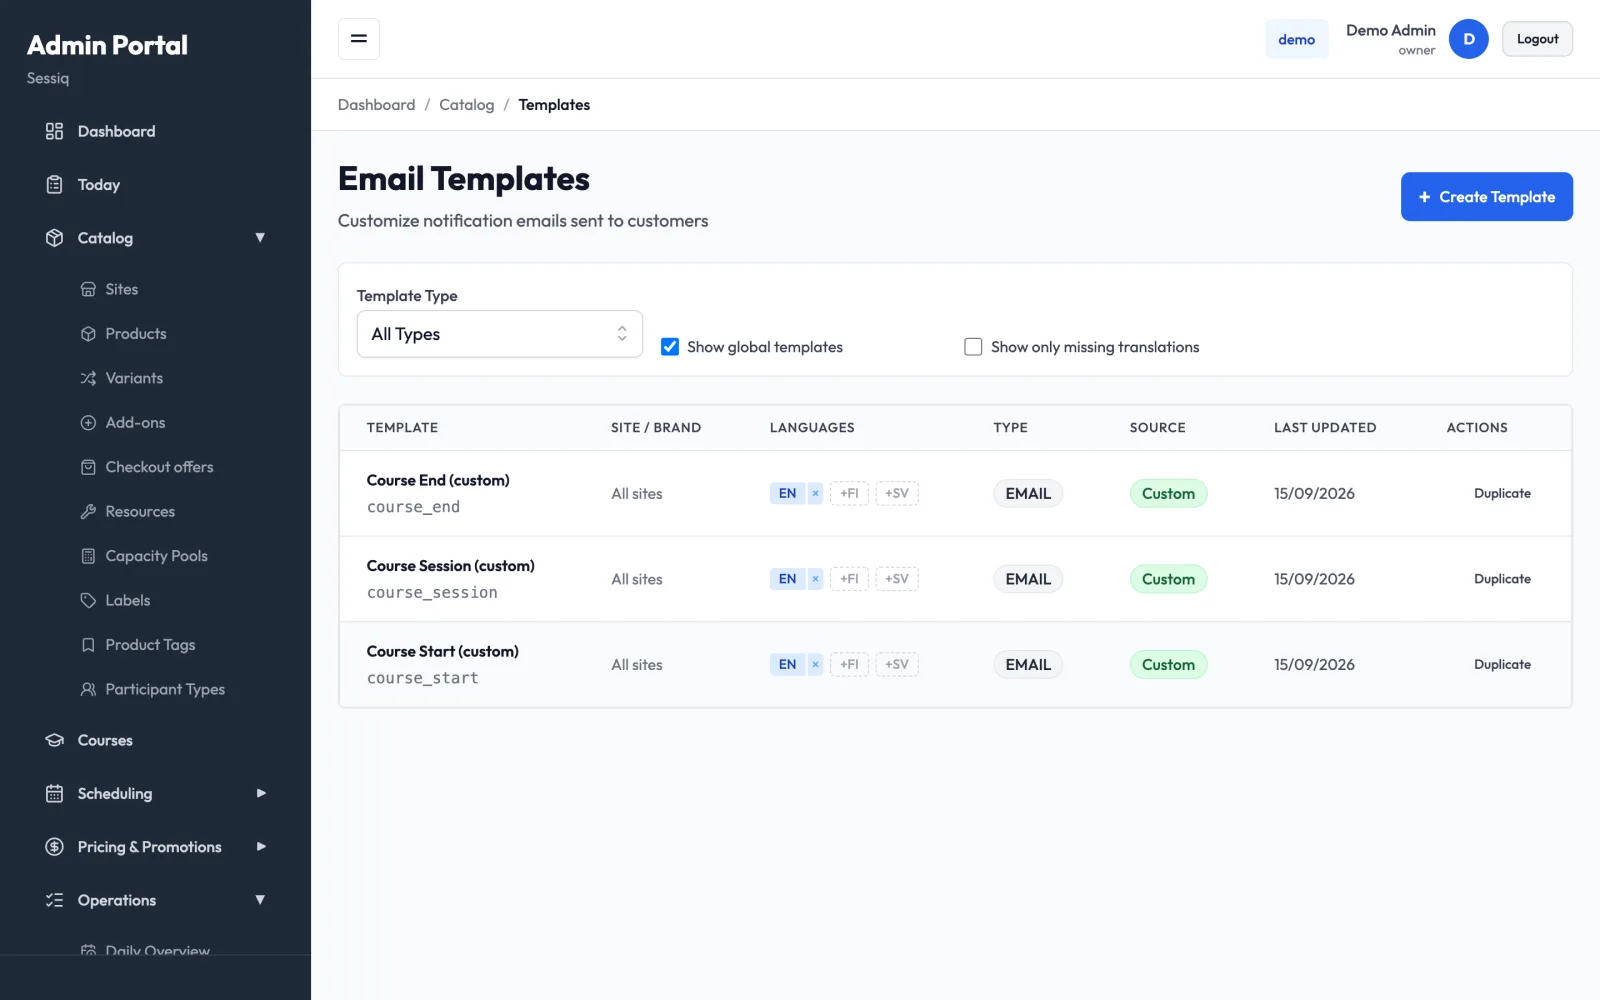
Open Communications → Email Templates. The list shows one row per template, and for each template:
- Template: the template's name, with its technical key underneath (for example
booking_reminder). - Site / Brand: All sites, or the name of the one brand the template is for.
- Languages: one chip per language: EN, FI and SV.
- Type: the channel, for example EMAIL.
- Source: Global if you are still using Sessiq's built-in text, Custom once you have your own version.
- Last Updated.
Filter the list
- Template Type shows a single template.
- Show global templates includes Sessiq's built-in templates. Untick it to see only your own versions.
- Show only missing translations lists only templates that lack at least one of English, Finnish or Swedish.
Language variants
Each language chip is its own version of the template:
- A filled chip (for example EN) is an existing version. Click it to edit. A small
*after the code means it is the built-in global text. - A dashed chip with a plus (for example +FI) means that language is missing. Click it to Add Finnish translation. Sessiq copies the existing text into a new Finnish version and opens it in the editor, ready for you to translate.
- The × next to a custom version deletes it. When a version is deleted, emails fall back to the global template if one exists.
When Sessiq sends an email, it picks the version that best matches the booking's site and the customer's language. The order is:
- A version for that site.
- A version for all sites.
- The global template.
If there is no version in the customer's language, the English one is used. Add a translation for every language your customers book in.
Customise a built-in (global) template
You can't edit or delete global templates directly. Make your own copy first:
- Click the global language chip, or click Duplicate on the row.
- In Clone Template, choose the Target Language. Pick the same language to make your own version of it, or a different language to start a translation.
- Click Clone Template. The copy opens in the editor, and its source changes to Custom.
Edit a template
- Click the language chip you want to edit.
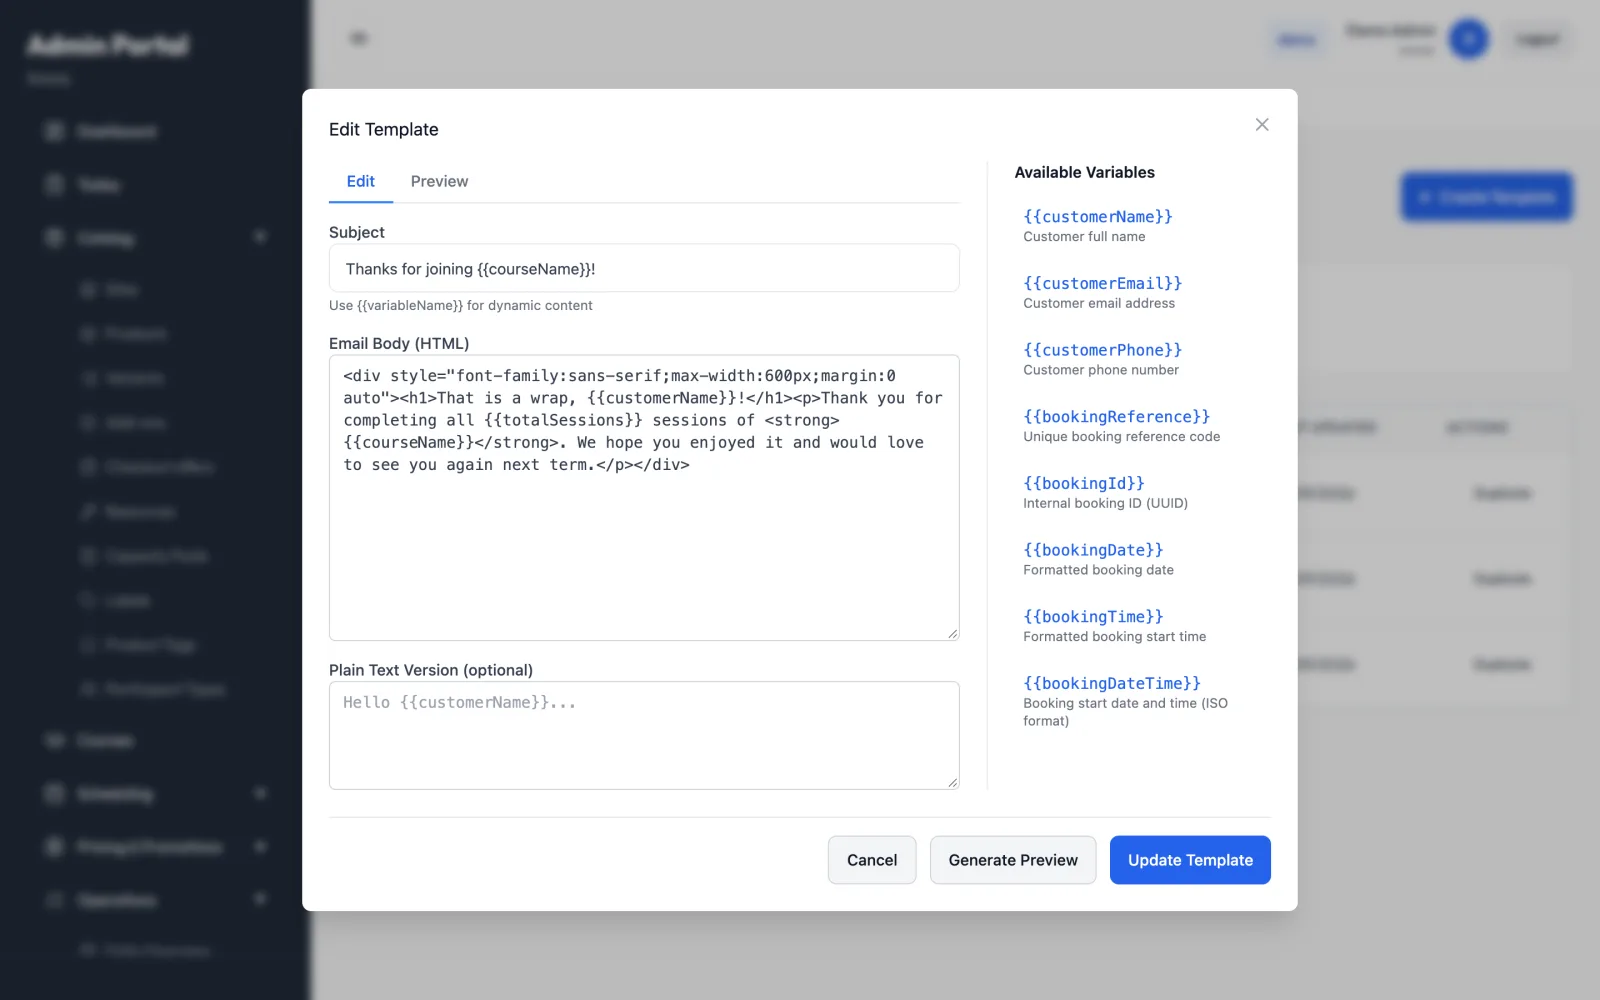
- Change the Subject. Use
{{variableName}}for dynamic content, for exampleYour booking {{bookingReference}} is confirmed! - Edit the Email Body (HTML).
- Optionally fill in the Plain Text Version (optional). Some email apps show this instead of the HTML.
- Click a variable under Available Variables to insert it into the body where your cursor is. Each template type has its own set of variables, such as
{{customerName}},{{bookingReference}},{{bookingDate}}and{{bookingTime}}. - Click Generate Preview to check the result. The Preview tab fills the variables with sample data and shows the subject and body. It also lists any Warnings:, for example a variable it did not recognise.
- Click Update Template.
Always preview after editing. A misspelled variable name is not filled in, and the customer would see it as written.
Create a template from scratch
- Click Create Template.
- Choose the Template Type (which email this is) and the Language.
- Fill in the subject and body as above.
- Click Create Template.
In most cases it is quicker to Duplicate the built-in template and edit the copy.
Automation rules
Open Communications → Automation Rules. Each rule connects a trigger to an email template.
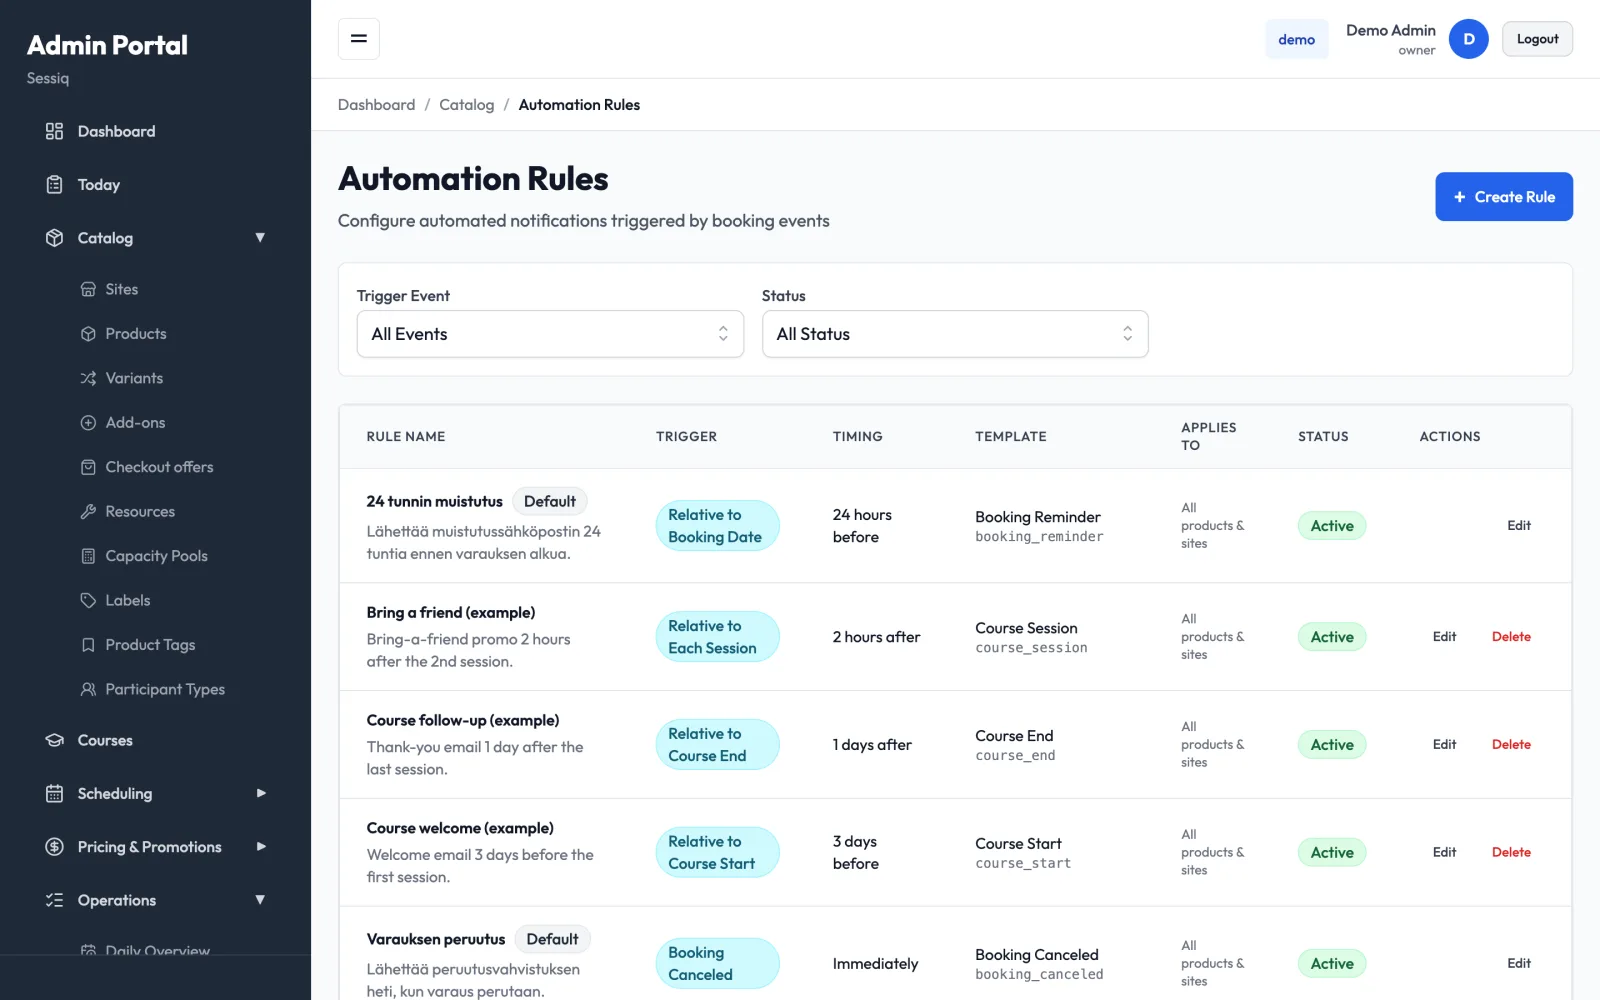
The list shows each rule's:
- Rule Name and description
- Trigger
- Timing, for example Immediately or 24 hours before
- Template
- Applies To: All products & sites, or the chosen sites and products
- Status
Filter the list by Trigger Event and by Status (Active or Inactive).
Default rules
Every account starts with four rules. They carry a Default badge.
| Rule | Trigger | Timing |
|---|---|---|
| Booking confirmation | Booking Confirmed | Immediately |
| Booking cancellation | Booking Canceled | Immediately |
| Booking reschedule | Booking Rescheduled | Immediately |
| 24-hour booking reminder | Relative to Booking Date | 24 hours before |
You can Edit a default rule, for example to change its template or limit it to some sites. Default rules have no Delete button.
The confirmation, cancellation and reschedule rules are required. They are always active, and their Rule is active checkbox is locked. You can turn the reminder rule off by clicking its status badge.
Create a rule
- Click Create Rule.
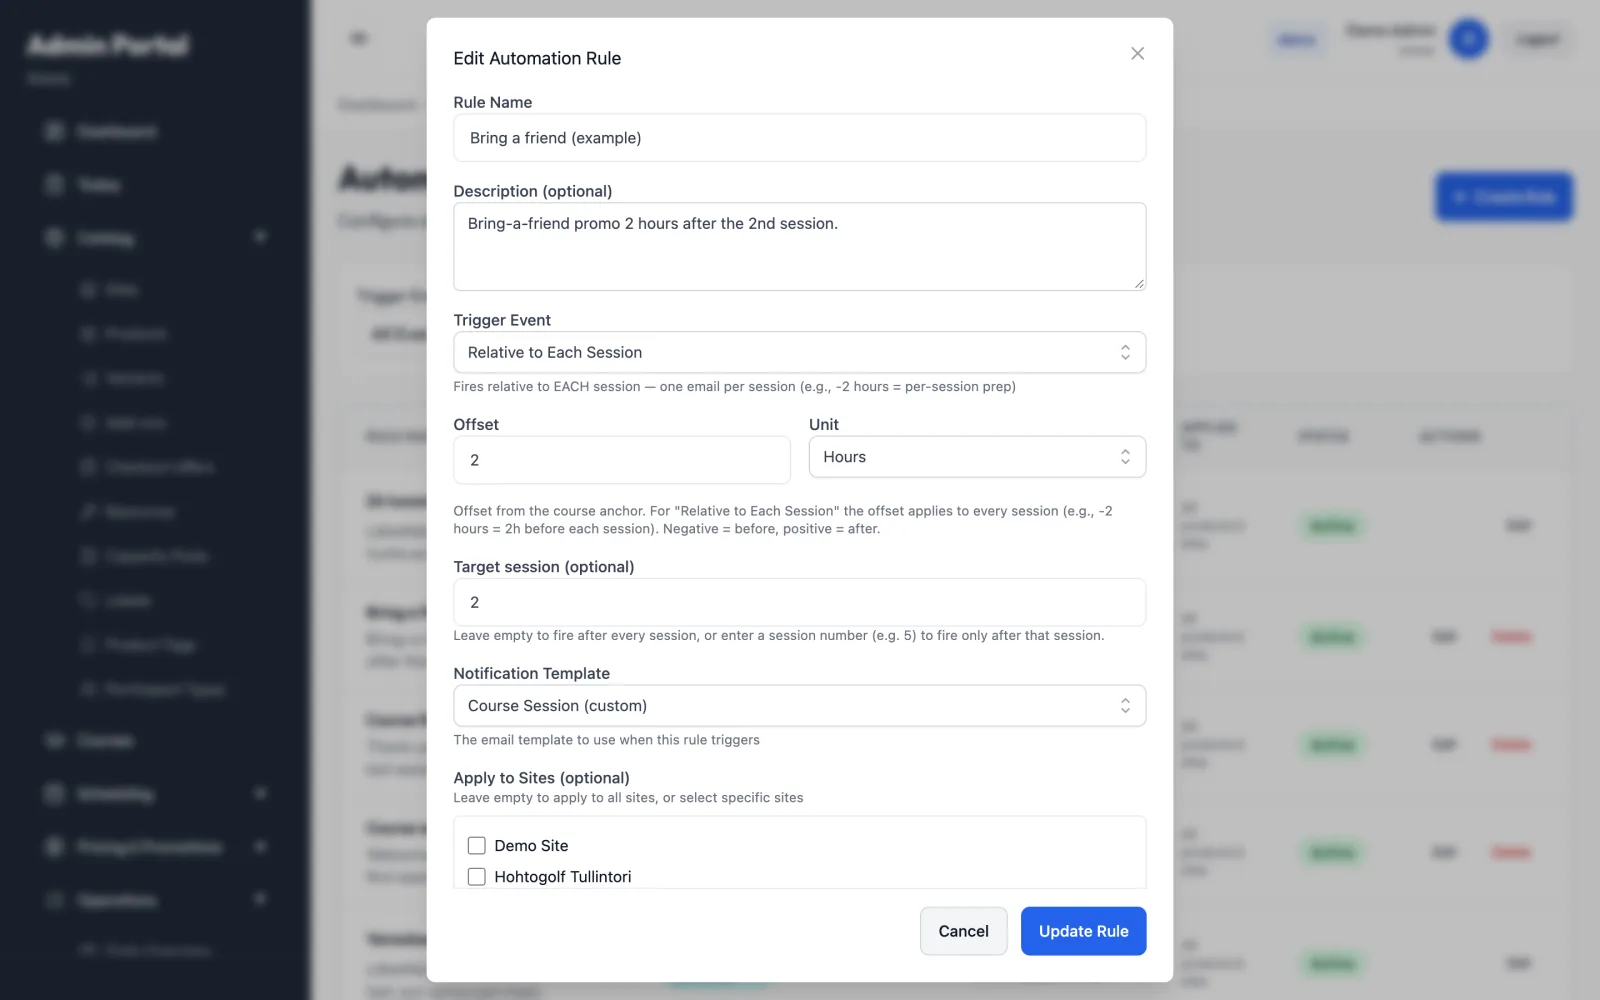
- Enter a Rule Name, and optionally a Description (optional).
- Choose the Trigger Event (see the table below).
- Set the Offset and Unit (Hours or Days):
- A negative offset sends before the anchor. For example,
-24hours sends 24 hours before the booking. - A positive offset sends after the anchor.
0sends immediately.
- A negative offset sends before the anchor. For example,
- For Relative to Each Session, you can set a Target session (optional). Leave it empty to send for every session of the course, or enter a number (for example
5) to send only for that session. - Choose the Notification Template.
- Optionally choose sites under Apply to Sites (optional) and products under Apply to Products (optional). Leave both empty to apply the rule everywhere. The site list only appears if you have more than one site.
- Keep Rule is active ticked, and click Create Rule.
| Trigger Event | When it fires |
|---|---|
| Booking Created | When a new booking is created |
| Booking Confirmed | When a booking is confirmed |
| Booking Completed | When a booking is marked completed |
| Relative to Booking Date | Relative to the booking's start time |
| Relative to Course Start | Relative to the course's first session |
| Relative to Each Session | Relative to every session, one email per session |
| Relative to Course End | Relative to the course's last session |
Booking Completed fires when staff mark a booking completed, and when the nightly job completes past bookings. Its offset counts from the end of the booking, so 1 Days sends a day after the visit ends. A booking that is reopened and completed again doesn't get the email twice. For a follow-up timed from the start of the visit instead, use Relative to Booking Date with a positive offset, for example 2 Hours.
Include a discount code
A rule can give every recipient their own discount code, for example a "come back" offer a few days after the visit.
- In the rule editor, tick Include a discount code.
- Choose the Discount type (Percentage (%) or Fixed amount (€)) and the Discount.
- Set Valid for (days), counted from when the email is sent (1–365).
- Optionally set Minimum spend (€, optional), Maximum discount (€, optional), the products the code works for under Code works for (leave all unticked for any product), and a Code prefix (optional) of up to 8 letters or digits, such as
THANKS. - Choose a template that shows the code. The built-in Discount Code Offer template does. In your own templates, add
{{couponCode}}and, if you like,{{couponDiscount}}(for example "10 %" or "10,00 €") and{{couponExpiresAt}}.
Each code is single-use, can't be combined with other discounts, and is created only when the email is actually sent. A scheduled email that never goes out, for example because the booking was cancelled, never creates a code. Rules with a code show a Discount code badge in the list. The codes don't appear in the Promotions list, but you can follow their use in promotion analytics.
Discount codes can't be added to the booking confirmation, cancellation, reschedule or reminder templates. Pick a template the automation sends itself, such as Discount Code Offer.
Examples
- Day-before reminder: Relative to Booking Date,
-1Days, Booking Reminder template. - Course welcome email: Relative to Course Start,
-3Days, Course Start (custom) template. - Course thank-you: Relative to Course End,
1Days, Course End (custom) template.
The Course Start (custom), Course Session (custom) and Course End (custom) templates are meant for course rules. Write their text under Email Templates before you turn the rule on. See Courses.
Turn a rule on or off, or delete it
- Click the Active or Inactive badge in the list to switch it.
- Delete is available on rules you created. Emails that are already scheduled are still sent, but the rule creates no new ones. For a rule that includes a discount code, turning it off or deleting it also cancels its scheduled emails, so no new codes go out.
Sender name
Customers see the name of the site (venue) the booking is for as the sender. If the site has no name, they see your business name. The sending address stays the same.
If your account uses its own email provider, you set the Sender Email and a default Sender Name under Settings → Email Configuration. Booking emails still show the site's name. The default sender name is used only when there is no site or business name to show. See Settings and branding. The logo, accent colour and footer of your emails are set under Branding, on the Email tab.
Related
- Reviews: the review request emails sent after a visit.
- Courses
- Settings and branding