Settings and Branding
The Settings menu in the admin sidebar groups your account-wide configuration. It has four pages:
- Integrations: which email, payment and image providers your account uses.
- Team: people and roles. See Team and roles.
- API Keys: keys for external integrations such as the WordPress plugin.
- Branding: logo, colors, fonts and other brand details.
The Settings menu is shown to owners and admins only, and only on desktop. It does not appear in the phone navigation.
These pages affect your whole account. Any change to a provider or a payment credential changes how customers are emailed and charged, so make it at a quiet time and test it with a booking.
Integrations (provider settings)
Open Settings → Integrations. The page is titled Settings and says "Configure integration settings for email, payments, and image storage".
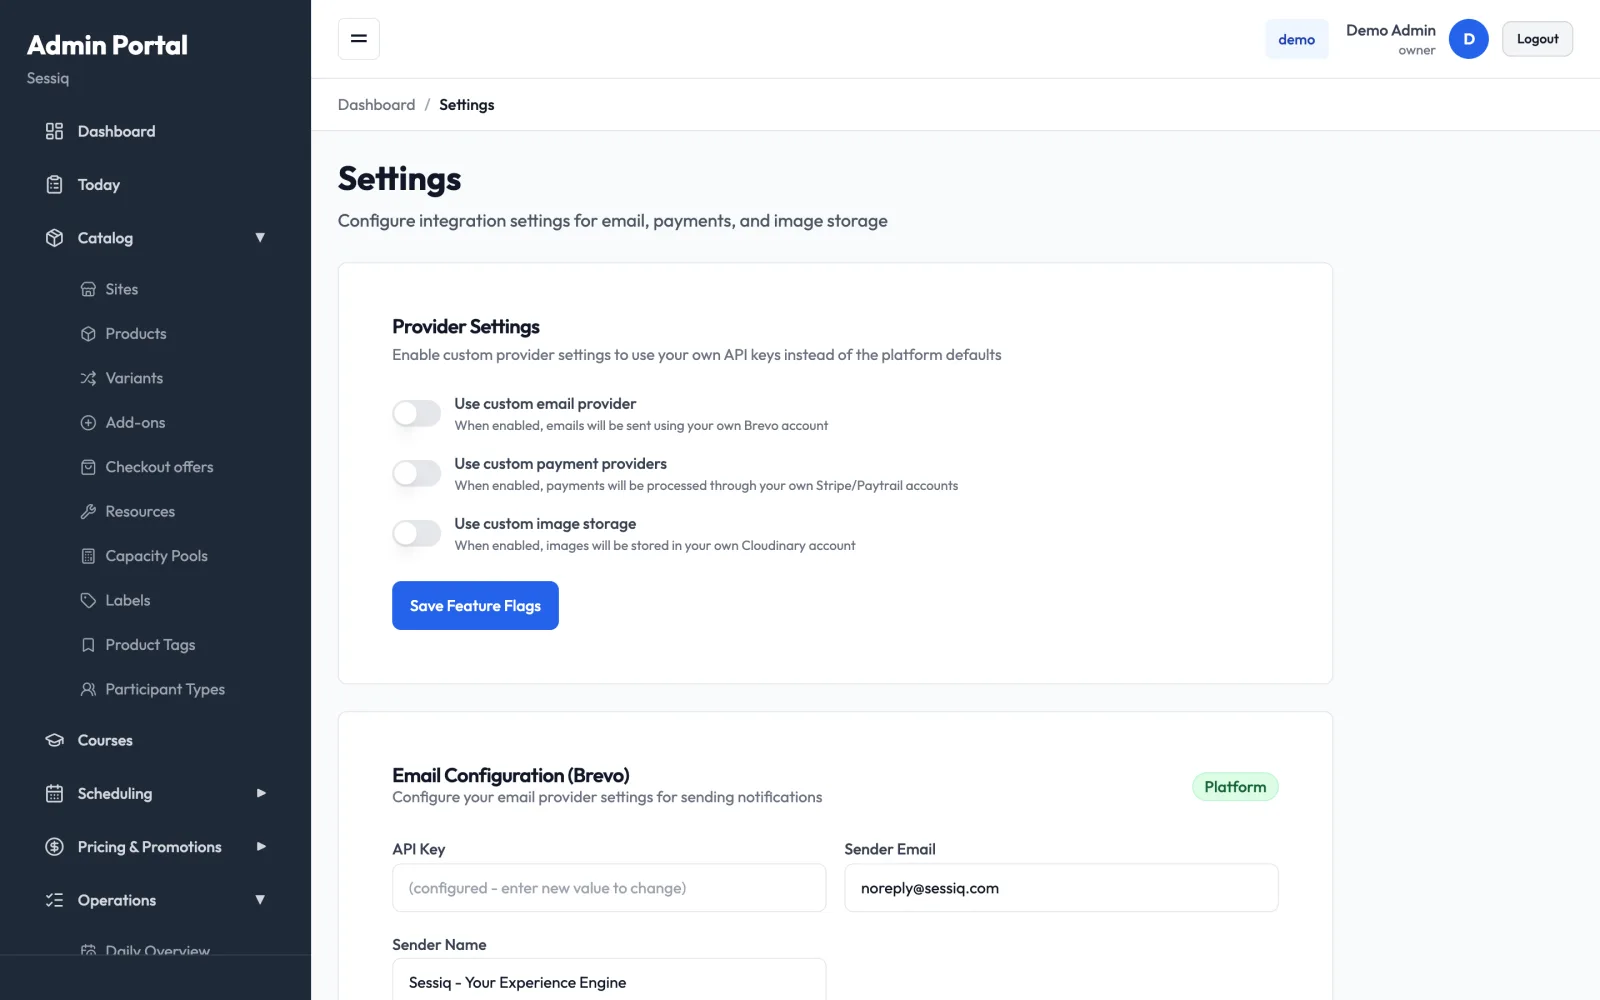
By default Sessiq sends email, takes payments and stores images through the platform's own accounts. Each card shows a badge:
- Platform: Sessiq's shared account is in use.
- Custom: your own account is in use.
Switch a provider to your own account
- Under Provider Settings, turn on the switches you need:
- Use custom email provider: emails are sent through your own Brevo account.
- Use custom payment providers: payments go through your own Stripe or Paytrail accounts.
- Use custom image storage: images are stored in your own Cloudinary account.
- Click Save Feature Flags.
- Fill in the matching card below and save that card with its own button.
Secret fields are never shown again after they are saved. They read "(configured - enter new value to change)". Leave a field empty to keep the stored value, or type a new value to replace it.
Email configuration
The Email Configuration (Brevo) card controls who your customer emails appear to come from:
- API Key: the key for your own Brevo account. Needed when you use a custom email provider, and for a campaign's marketing opt-in, which adds contacts to a list in your Brevo account.
- Sender Email: the "from" address on customer emails.
- Sender Name: the display name customers see in their inbox, for example your venue's name.
Click Save Email Settings when you are done.
Email redirect mode (testing)
Email Redirect Mode (Testing) sends every email to one address of your choice instead of to customers. Use it while you set up or test the account.
- Turn on Enable email redirect.
- Enter a Redirect Address.
- Click Save Email Settings.
While redirect is on, no customer receives any email: no confirmations, reminders or cancellations. Turn it off again before you take real bookings.
The emails themselves (their content and when they are sent) are managed separately. See Emails and automations.
Payment configuration
The Payment Configuration card holds your account-wide credentials for:
- Stripe: Secret Key, Publishable Key, Webhook Secret.
- Paytrail (Finnish Bank Payments): Merchant ID, Secret Key.
A provider with stored credentials shows a Configured badge. Click Save Payment Settings to store changes. Get these values from your payment provider's dashboard, and never share them in email or chat.
Per-site payment credentials
If a site should be paid into its own merchant account, use the Per-Site Payment Credentials card. Bookings for that site are then charged and refunded through the site's own Stripe or Paytrail account instead of the account-wide one.
- Choose the site in Site.
- Turn on Use custom payment credentials for this site. When it is off, the site uses the account-wide payment settings above.
- Enter that site's Stripe and/or Paytrail credentials.
- Click Save Payment Settings.
If you turn the switch on but enter no credentials, a warning appears. The site then keeps using the account-wide settings. For how payments and refunds show up on bookings, see Payments and refunds.
Image storage
The Image Storage (Cloudinary) card takes a Cloud Name, API Key and API Secret. Click Save Image Settings to store them.
Branding
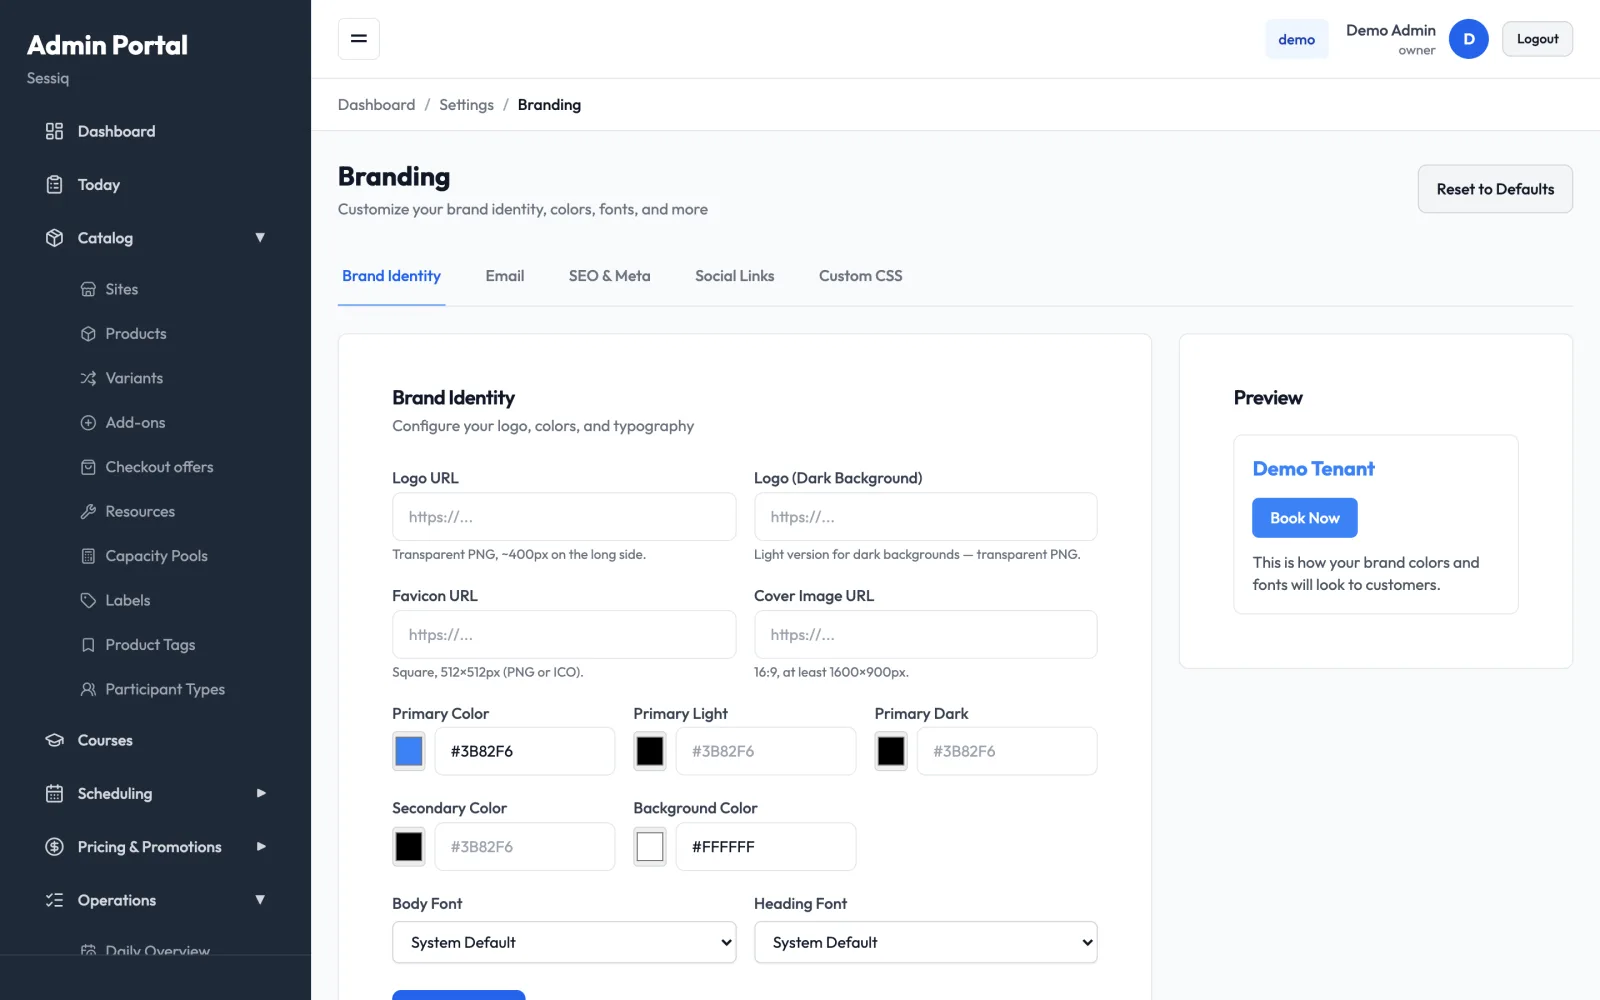
Open Settings → Branding to set your brand identity. The page has five tabs: Brand Identity, Email, SEO & Meta, Social Links and Custom CSS. Each tab has its own Save Changes button, so save a tab before you move to the next one. If you try to leave with unsaved changes, the page asks you to confirm first.
Brand identity
- Logo URL: transparent PNG, about 400px on the long side.
- Logo (Dark Background): a light version of the logo for dark backgrounds.
- Favicon URL: square, 512×512px (PNG or ICO).
- Cover Image URL: 16:9, at least 1600×900px.
- Primary Color, Primary Light, Primary Dark: enter hex colors such as
#3B82F6. You can use the color picker or type the value. If you leave Primary Light and Primary Dark empty, they are created from the primary color when you save. - Secondary Color and Background Color.
- Body Font and Heading Font: choose System Default or a web font such as Inter, Roboto, Open Sans, Lato, Poppins or Montserrat.
The embedded booking widget uses your Primary Color. It also uses your Secondary Color for buttons. If the secondary color is empty, buttons use the primary color.
The Preview panel
The Preview panel on the right updates as you type. It shows your logo, your name in the primary color and heading font, a Book Now button and, if set, a Secondary button. It uses the body font on your background color. Use it to check contrast before you save.
Email, SEO and social tabs
- Email: Email Logo URL (about 200px wide), Email Footer Text and Email Accent Color for emails sent to customers.
- SEO & Meta: Meta Title, Meta Description and Open Graph Image URL (1200×630px). These set how your booking page appears in search results and social-media previews.
- Social Links: links to your Facebook, Instagram, X (Twitter), LinkedIn, YouTube and TikTok profiles, and your Website.
Custom CSS
The Custom CSS tab lets you add your own styles for advanced changes. It is available only on plans that include white-labeling. On other plans, saving shows an error asking you to upgrade. For safety, CSS containing scripts, @import or embedded data URLs is rejected.
Site-specific branding
Sites can override the account branding. Open Catalog → Sites, edit a site, and use Branding Overrides. You can set a site's Logo URL, Favicon URL, Cover Image URL, Primary Color and Secondary Color. Empty fields inherit the account branding. A booking widget set up for that site then uses the site's colors.
A site's Brand name (in the same site form, for example Korkee) is the business name customers see in gift card emails: the sender name, the subject line and the footer of delivery, purchase confirmation, expiry reminder and extension emails. Leave it empty to use the site name. Booking emails keep using the site name, because a booking always belongs to one specific site.
Reset to defaults
Reset to Defaults (top right) puts all branding back to the platform defaults: colors, fonts, logos, SEO, social links and custom CSS. You must confirm with Reset Everything, and the reset cannot be undone.
API keys
Open Settings → API Keys to manage keys that let external tools, such as the WordPress plugin, read your booking data.
Create a key
- Click Create API Key.
- Enter a Key Name that says where the key is used, for example "WordPress Plugin".
- Under Permissions, tick only what the integration needs. Each permission has a short description.
- Click Create Key.
- The full key is shown only once. Click Copy, paste it into the integration's settings, then click I've copied the key.
If you lose a key, you cannot view it again. Create a new key, update the integration, then revoke the old key.
Review and revoke keys
Your API Keys lists every key with its:
- name and status
- first few characters
- permissions
- creation date
- last-used date
- number of requests (Usage)
To stop a key from working, click Revoke and confirm. This cannot be undone. Revoked keys stay in the list, greyed out, as a record.
Related pages
- Team and roles
- Emails and automations
- Payments and refunds
- Advanced features: tenant policies, tax and test mode