Campaigns
Campaigns are advent calendars and other seasonal calendars. A campaign has a set of numbered doors, and each door opens on its own day. Behind a door there is a free discount code the customer claims with their email address, a prepaid voucher they can buy at a special price that day, or a gift card that comes with a free bonus.
Open Pricing & Promotions → Campaigns in the admin navigation.
The campaign list
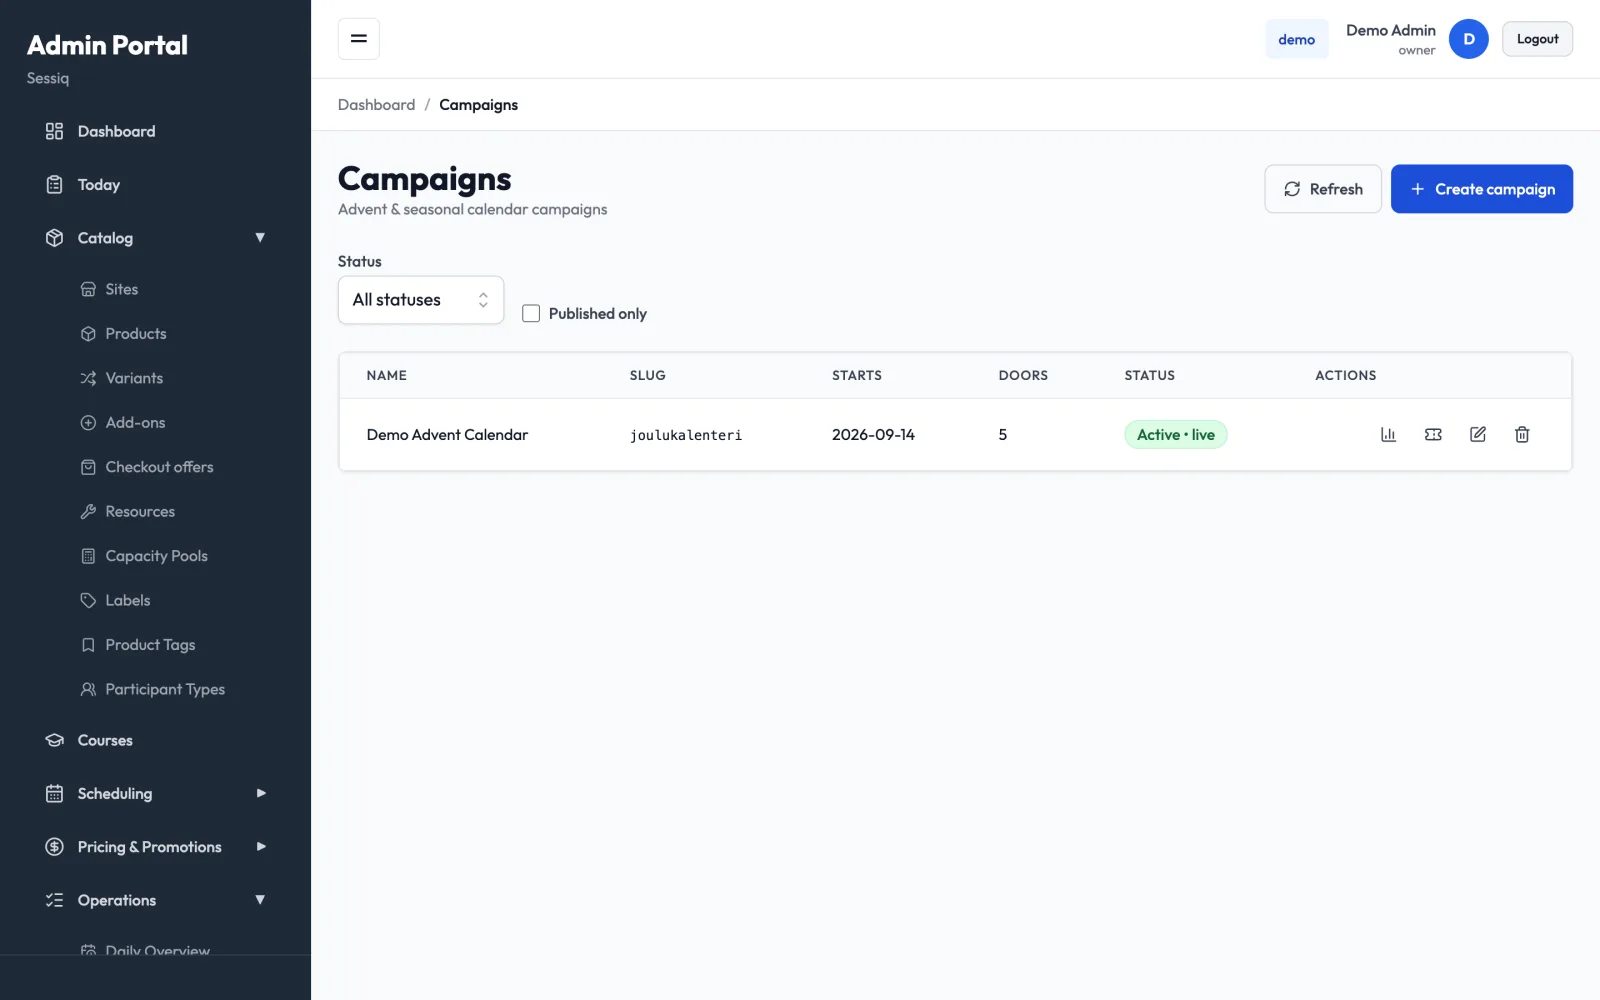
Each row shows the campaign Name, Slug, start date (Starts), the number of doors configured so far (Doors) and the Status. "• live" after the status means the calendar is publicly visible. Filter by Status, or tick Published only to see just live campaigns.
The action icons on each row are, from left to right:
- Report
- Issued codes
- Edit campaign
- Delete campaign
Create a campaign
- Click Create campaign.
- Fill in the campaign details:
- Name (EN / FI) and Intro (EN / FI): the title and short introduction customers see, in English and Finnish
- Slug: the short name used in the calendar's web address, for example
advent-calendar - Start date: the day door 1 opens. Door 2 opens the next day, and so on.
- Number of doors: 24 by default
- Claims counter threshold: once this many people have claimed today's door, the calendar shows the claim count to encourage others. The default is 5.
- Status: Draft, Scheduled, Active or Ended
- Live (publicly visible): switch this on to publish the calendar
- Hero image URL: a banner image at the top of the calendar. 1200×600 is recommended. Paste the address of an image hosted online.
- Show offers in advance: lets visitors see every door's offer before it opens (see What customers see). Update the calendar widget on your sites before turning this on.
- Click Save.
Customers can only see and use the calendar when its status is Active and Live is on. Keep it in Draft with Live off while you set up the doors.
Marketing opt-in
A campaign can grow your newsletter list. When the opt-in is on, the claim form and the prepaid and gift card purchase forms show an unticked box such as "Send me news and offers". Ticking it is never required: a customer who leaves it empty gets their code exactly as before.
When the box is ticked, the form also shows the questions of your Brevo list:
- Cities the customer visits: one or more, required. The city of the door's venue is ticked already (or, if that city isn't one of the options, the city of the site the calendar is on).
- Interests: any number, optional.
- Email frequency: one choice; the first option is chosen already.
The options and their wording come from the campaign's Brevo profile. There is no prize draw on these forms: a draw belongs to your own newsletter signup form.
Opt-ins are sent to your own Brevo account with double opt-in: Brevo emails the customer a confirmation link, and they join the list only after clicking it. A claim's opt-in is sent straight away; a purchase's opt-in is sent only once the payment has gone through. If Brevo is down, the claim or purchase still succeeds and the opt-in is retried in the background.
Set up the opt-in
Before you start, save your Brevo API key in the Email Configuration (Brevo) card under Settings → Integrations (see Settings & branding). The opt-in uses this key even if Use custom email provider is off, so your customer emails can keep going through Sessiq. The key must have access to contacts.
Then edit the campaign. The Marketing opt-in section is at the bottom of the campaign editor:
- Brevo list ID: the list opt-ins are added to
- Brevo double opt-in template ID: the Brevo template that sends the confirmation email
- Redirect after confirming (URL) (EN / FI): the page the customer lands on after clicking the confirmation link
- Newsletter checkbox text (EN / FI): the text next to the optional newsletter checkbox. The customer gets the code whether they tick it or not. Say what they subscribe to, that existing subscribers can tick it to update their choices, and that they can unsubscribe at any time.
- The text version under the field is set by Sessiq: today's date when you save a new or changed text (
2026-10-28, then2026-10-28.2for a second change the same day). It is stored with every sign-up, so you can later tell which text each customer saw. Saving the same text again keeps the version. - Brevo profile (JSON): how the answers are stored in your Brevo list (see below). Paste it once per campaign; the box tells you right away if something is wrong.
- Show the opt-in on the forms: switch this on last. Saving is refused until the list, template, redirect URLs, newsletter checkbox text, Brevo profile and the Brevo key are all set.
Click Save, then Test Brevo connection. It checks that your Brevo key can see the list and shows the list's name.
Under the checkbox the calendar shows "We process your data in line with our privacy policy", linked to the site's privacy policy. The link comes from the embed's privacyUrl setting (see JavaScript widget); without it the line is not shown.
The Brevo profile
The profile ties the form to the contact attributes your Brevo list already has. Brevo silently ignores a value that doesn't match an attribute's options, so the profile spells every value exactly as Brevo has it. It holds:
attributes: the Brevo attribute names for the cities, interests, frequency and consent version, and optionally the source, site and signup date.cities,interests,frequencies: the options. Each has akey(lowercase letters, digits,-and_), alabelin Finnish and English (shown on the form) and abrevoValue: the option's name for a multiple-choice attribute, its number for a category attribute.sourceValue: the value saved in the source attribute for every opt-in from the calendar.siteValues: the value of the site attribute for each site, keyed by site ID or site origin. The site is the one of the door's product.
Every opt-in also saves today's date (Finnish time) in the signup date attribute, and the text version with the language, for example 2026-10-28-fi. Ask your developer for the profile when you set up a new list.
Customers who are already on the list
Before sending an opt-in, Sessiq looks the email address up in Brevo:
- New to Brevo: Brevo sends the confirmation email, and the customer joins the list after clicking it.
- Already on the list: no new confirmation email. The cities and interests they chose earlier are kept and the new ones added; their email frequency stays as it was.
- In Brevo but not on this list, or unsubscribed: Brevo sends the confirmation email again. Earlier cities and interests are kept.
So a returning subscriber who ticks the box on another day never loses the answers they gave before.
To stop collecting opt-ins, switch Show the opt-in on the forms off. Opt-ins already stored stay in the issued codes and the CSV.
Opt-ins aren't synced back from Brevo: if a customer unsubscribes, Brevo handles it. When you use Erase personal data for a customer, their campaign codes and answers are anonymised in Sessiq, but the contact stays in Brevo — remove it there too.
Add doors
Doors are added after the campaign is saved. Click the edit icon on the campaign, then Add door in the Doors section.
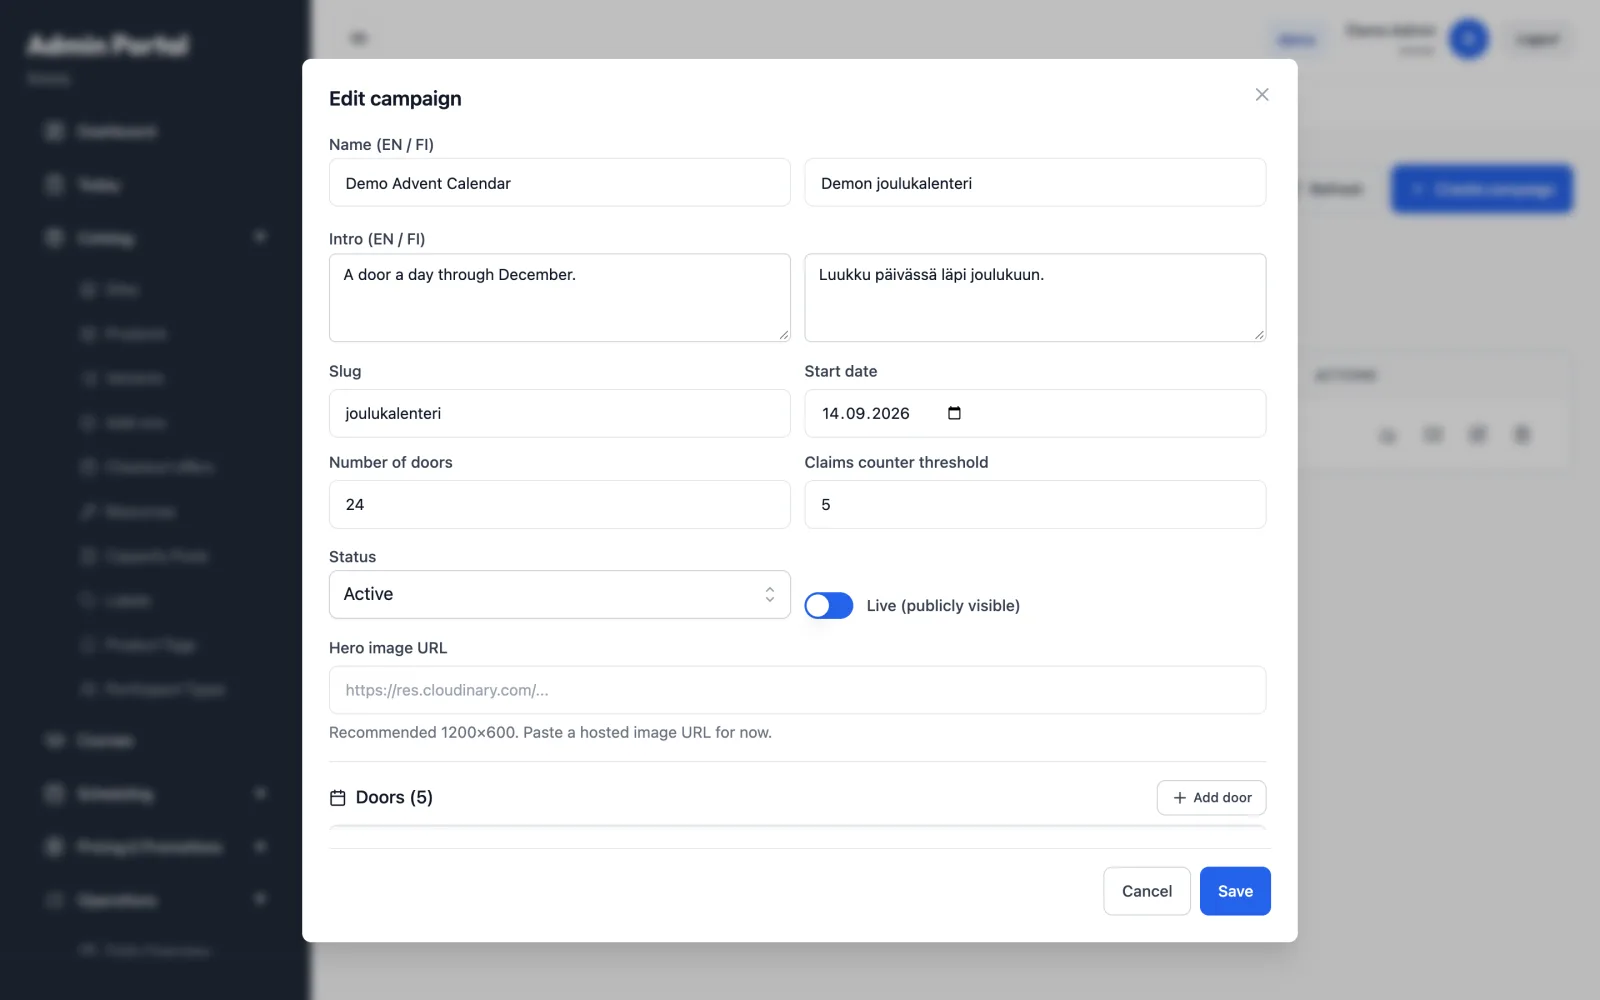
For each door:
- Enter the Day (door number). The door opens on the start date plus that number of days minus one. The doors list shows the date under Opens on.
- Choose the Door type:
- Email claim (free code): the customer enters their email address and gets a personal discount code
- Prepaid voucher (buy now): the customer buys a voucher for a product at a discounted price
- Gift card + bonus (buy now): the customer buys a normal gift card and gets a free bonus code with it (see Gift card doors)
- Link to the gift card shop: the door explains a gift card bonus offer and sends the customer to the gift card shop (see Link doors)
- For an Email claim door, set:
- Reward type: Percentage (%) or Fixed amount (€)
- Reward value
- Minimum spend (€), if the code should only work above a certain booking total
- Visit rules, if the code should only work for certain visit dates (see below)
- For a Prepaid voucher door, set:
- Featured product: the product being sold. It must be active and have a base price: the voucher is worth that price, so a door on a product without a price can't be saved.
- Purchase price (€): the discounted price the buyer pays now. The voucher covers the product's full price.
- Voucher duration, for a product booked in several lengths (for example Laser "Avoin peli": 30, 60 or 90 min). The voucher is worth the price of the chosen length: 60 min makes a 20 € voucher. A customer who books longer pays the difference (90 min: 8 €); on a shorter booking the rest of the voucher is not refunded. Leave it on Base price to use the product's base price. The door shows the length, for example 60 min.
- Usage days, if the voucher should only work on certain days (see Usage days on prepaid doors).
- For a Gift card + bonus door, set the fields described in Gift card doors.
- Optional for all types:
- Quantity cap: how many codes or vouchers the door can hand out. Leave it blank for unlimited. When the cap is reached, the door shows as sold out.
- Redeem from and Redeem until: when the code can be used at checkout. For an email-claim door this is the day the customer books, not the day they visit; use Visit rules to limit the visit date. For a prepaid voucher door it is the first and last day of the visit: a voucher valid 7.1.–31.3. can be booked in December for a visit in January, but not for a visit in December.
- Write the customer-facing text: Title, Description, Badge and Terms, each in English and Finnish. You can also add an image for the door.
- For an Email claim door, tick the products the code applies to under Products. The reward is taken off those products only, never off their add-ons: the form reminds you with "Prosenttiale koskee valittuja tuotteita, ei lisäpalveluita." A 25 % party code on 230 € of tickets and a 129 € treat pack gives 57,50 € off. To discount only an add-on, for example "party catering free", also tick it under Discount add-ons only. See Add-on discounts.
- For an Email claim door, optionally choose a Book-now product. After the customer claims the code, a button takes them straight to booking with the code. See Book now.
- Click Save.
Add-on discounts
An email-claim code can discount an add-on instead of the whole booking. For example, a party door can make the catering free while the party itself costs the normal price.
- Under Products, tick the party product. The code only works on bookings for it.
- Under Discount add-ons only, tick the add-on, for example the catering. Only the add-ons of the ticked products are listed.
- Set the reward. Percentage takes that share off the add-on (100 % = free). Fixed amount takes up to that amount off the add-on, never more than its price.
A per-guest add-on is priced by the number of guests, so "100 % off the catering" is free for any party size: 8 guests × 4,90 € = 39,20 € off, 15 guests = 73,50 € off.
If the customer enters the code before adding the add-on, the code is kept but gives 0 €. Checkout tells them to add the add-on, and the discount appears as soon as they do. The code competes with automatic promotions as usual: the booking gets the larger of the two.
The campaign report marks the door's discount as an add-on discount, and the bookings export shows it per add-on with the add-on's VAT rate (discountAllocations).
Visit rules
Visit rules limit which bookings an email-claim code works for. They apply to the date of the visit at the venue, whenever the customer books. Use them to keep a door's discount in the quiet season:
- Visits from and Visits until: the first and last day a visit may fall on. For example 7.1.–31.3.
- Allowed weekdays: tick the days the visit may fall on, for example Thursday and Friday. Leave all unticked to allow every day.
- Excluded dates: up to 10 date ranges the code doesn't work in, for example the winter holiday weeks 22.2.–14.3. Click Add excluded dates for each range.
The doors list shows the rules in short form under Visit rules, for example to–pe, 7.1.–31.3. (ei 22.2.–14.3.). The claim confirmation and email list them next to the code, so you don't need to repeat them in the Terms.
If a customer tries the code on a booking outside the rules, it's refused with a message such as "Koodi on voimassa vain to–pe" ("The code is valid only Thu–Fri").
Rules are copied onto each code when it is claimed. If you change a door's rules later, codes already sent keep the old rules; only new claims get the new ones.
Gift card doors with a bonus have no visit rules. Prepaid voucher doors and visit pass doors have their own version, below.
Usage days on prepaid doors
A prepaid voucher door can limit the days its vouchers are used on, for example to move visits to quiet weekdays. Under Usage days:
- Allowed weekdays: tick the days the visit may fall on, for example Wednesday, Thursday and Friday. Leave all unticked to allow every day.
- Excluded dates: up to 10 date ranges the voucher doesn't work in, such as winter holiday weeks.
- Public holidays on allowed weekdays: choose Not valid or Valid. You must choose one whenever you tick weekdays or add excluded dates. Under the choice the form lists the holidays it affects inside the redeem window, for example pe 26.3. pitkäperjantai. The holiday calendar covers the Finnish public holidays, including Midsummer Eve, Christmas Eve and May Day.
The window is the door's Redeem from and Redeem until. All rules apply to the date of the visit at the venue.
Customers see the rules with the actual days, for example Käytettävissä ke–pe, 7.1.–31.3.2027, ei arkipyhinä (pe 26.3.):
- on the door, before they buy, and again next to the pay button
- on the payment success page and in the voucher email, next to the code
- on the gift card balance page, when someone checks the code (useful for gift recipients)
The voucher email has a Book a time button. It opens the product's booking page on the brand's own site, set under Booking page URL in the site's settings, with the product and code filled in. If the site has no booking page URL, the button opens the Sessiq booking page instead. Days the voucher can't be used on are greyed out in the calendar there. If a customer books elsewhere and types the code at checkout for a wrong day, it's refused with the valid days, for example "Tämä lippu kelpaa vain ke–pe, 7.1.–31.3.2027".
Rules are fixed when the voucher is sold. Each voucher keeps the rules its door had at the time of purchase, including which holidays are excluded. If you change a door's usage days later, only vouchers sold after the change get the new ones. To change the rules of one voucher that has already been sold, for example after a complaint or when opening hours change, open Vouchers, find the code and click the Usage days icon. A reason is required; the old and new rules and the reason are kept in the voucher's history.
Staff can make an exception. At the front desk, in the walk-in point of sale and on bookings made in the admin, a voucher used on a day its rules don't allow is shown with a warning. Staff can still use it by writing a reason. The reason is saved with the redemption, and the campaign report counts these exceptions.
Usage days on visit pass doors
A gift card door that sells a visit pass has the same Usage days section as a prepaid door: Redeem from and Redeem until, Allowed weekdays, Excluded dates and Public holidays on allowed weekdays, with the same rules (a holiday choice is required when you set weekdays or excluded dates). For example: valid Wednesday to Friday 7.1.–31.3.2027, not in the ski weeks 22.2.–14.3., not on public holidays.
- Fixed when the pass is sold. Every pass sold from the door keeps the rules the door had at the time of purchase. Editing the door changes only passes sold afterwards.
- Validity. A pass expires at the end of Redeem until or at the end of the product's own validity, whichever comes first.
- Every site. A pass valid at several sites follows the same days everywhere; each visit is judged by the date at the site visited.
- Where it is checked. Online bookings with the pass code are refused on other days with the valid days named. Front desk staff using visits under Redeem voucher on such a day see a warning and can still continue by writing a reason, which is saved on the visit.
- Where it is shown. On the door before buying and next to the pay button, on the payment success page, in the pass email (also when it is a gift), on the balance page and at the desk.
A pass sold from a door without usage days works as before.
Gift card doors
A gift card door sells one of your gift card products at its normal price and adds a free bonus code. For example: buy a 40 € gift card on 20.12. and get a 10 € bonus to use 7.1.–28.2.
The customer gets two separate codes:
- The gift card is an ordinary gift card for the amount paid. It has the product's normal validity, shows on the gift card Purchases tab, and counts in the gift card reports like any other card.
- The bonus is a free extra code. It can only be used inside its own window, it is a discount (not money), and it can't be refunded or extended.
Set:
- Gift card product: an active gift card product. Its name is the offer's name.
- Purchase price (€): what the buyer pays, which is also the gift card's value. For a fixed-value product this is the product's value and can't be changed. For a custom-amount product, choose an amount within its minimum and maximum.
- Bonus (€): the bonus amount
- Bonus validity:
- Bonus valid from: the first day the bonus can be used. Leave it blank to allow use straight after the purchase. It can be later than the door, for example 7.1. for a December door, to bring visits into a quiet month.
- Bonus ends: either On a date (Bonus valid until), or Days after the purchase (Valid for (days)). Days are counted from Bonus valid from if that is later than the purchase. The end must be after the start.
The Quantity cap limits how many gift cards the door sells. A card waiting for payment holds its place for 30 minutes.
The buyer can send the gift to someone else, with a message and a delivery date such as 24.12. The bonus is always sent to the buyer, who can use it or pass it on, for example to the gift recipient. When the card is a gift, the recipient gets only the gift card (on the delivery date, if one is set), and the buyer gets the bonus code in their purchase confirmation straight after paying. When buyers keep the card themselves, they get one email with both codes. Gift card doors are sold in the calendar embedded on your website; the calendar page on the Sessiq booking site shows the offer but doesn't sell it.
Which site sells the card. If the gift card product belongs to a site, that site sells it. If the card is valid at all sites (no site), the site whose web page the calendar is on sells it: its payment account is charged and its name is on the emails. A card bought in the calendar on korkee.fi is therefore Korkee's sale, even though the card can be used at every site. The settlement report shows which site sold and which used each card.
At checkout the customer can enter both codes on the same booking; one bonus code can be used per booking. The bonus is used first and the gift card pays what is left, so the paid balance lasts longer. Before its first day the bonus is refused with a message such as "Koodi on voimassa 7.1. alkaen" ("The code is valid from 7.1.").
Refunds and how the bonus shows in the gift card reports are covered in Gift cards.
A gift card door can also feature a visit pass, such as a series, season or family ticket (see Visit passes). To sell it only from the door, tick Calendar only on the product (see Sell a product only in the campaign calendar). Choose the pass as the product and set a door price below the pass's normal price. A pass door has no bonus fields; the calendar shows the door price next to the normal price and lists what the pass covers.
Link doors
A link door promotes a gift card bonus offer from Gift cards → Bonus offers, for example a one-day offer "buy for at least 50 €, get a 10 € bonus". The door opens on its day, shows the offer and has a button to the gift card shop. The customer buys a normal gift card there, so the offer's tiers and bonus cap apply as usual. A gift card door can't do this: it sells one product at one price and doesn't apply bonus offers.
- Choose Link to the gift card shop as the door type.
- Under Link target, choose a gift card product to send customers straight to its page, or Gift card listing for the whole shop.
- Optionally, under Bonus offer to show, choose the offer. The door then shows its tiers, when it ends and how many bonuses are left. The offer must cover the chosen product.
- Write the door's title, description and terms as usual.
A link door has no price, quantity, redeem window or visit rules. Customers on the calendar page go to the gift card shop in their own language, for the calendar's site, with the page's campaign tracking (UTM) parameters. In the calendar embedded on a brand site, a door with a product opens the normal gift card purchase on the same page. The campaign report lists link doors as link; their sales show in the gift card reports.
Edit or delete a door from the doors list. You can't lower Number of doors below the highest door number you have already set up.
What customers see
- Doors for future dates stay locked, and past doors show as expired.
- With Show offers in advance on, future doors show their offer instead: the image, title, description, reward or product, and price, with a note saying which day it opens. They have no claim or buy button, and don't show how many are left.
- Only today's door can be claimed or bought.
- Each email address can claim a door once. Claiming again shows the same code.
- A claimed code is a personal, single-use discount code for that door's products. It can't be combined with other promotions. The customer receives it by email.
Book now
The calendar can send the customer on to booking with their code, even when the product belongs to another brand's site:
- An Email claim door with a Book-now product shows Book now with your code once the customer has claimed the code. The open door shows only the claim form, so getting the code comes first.
- A Prepaid voucher door's result shows Book now with your code for the voucher's product.
- A Gift card door's result shows Book now with your code for its Book-now product.
The button opens the booking page URL of the product's site (set under Catalog → Sites, see below). That page opens the product's booking window, and the code is applied at the payment step. If the site has no booking page URL, the button goes to the product on the Sessiq booking site instead. A gift card door shows the button only when its product's site has a booking page URL.
To set a site's booking page:
- Open Catalog → Sites and edit the site.
- First make sure the brand's domain is under Allowed widget origins.
- Enter the Booking page URL: the full address of the page on that brand's website that shows the booking widget, for example
https://brand.fi/varaa. It must start withhttps://, and its domain must be one of the allowed origins. - Click Save.
Set this for every brand whose products appear in the calendar. The booking page must run a widget version that understands the Book-now link; see JavaScript widget.
Report
Click the Report icon to see how the campaign is performing. The totals at the top show Claims, Redemptions (claimed codes that were used in a booking), Discount granted, Prepaid sold, Prepaid revenue, Prepaid redeemed (prepaid vouchers that have been used, in a booking or at the desk) and Prepaid redeemed value (the face value of those vouchers). For gift card doors they also show Gift cards sold and Gift card revenue (paid, not refunded), Bonus issued (the bonus value handed out with those cards) and Bonus used (how much of it has been used in bookings). The table below breaks the same figures down per door (Day). For prepaid voucher doors, Redemptions by weekday shows on which weekdays the vouchers were used (the visit's day, or the day redeemed at the desk), for example ke 3 · pe 5 · la 1, and how many of them were staff exceptions. Use it to see whether a door's usage days moved visits to quieter days. The CSV download has the same figures as columns Redeemed Mon to Redeemed Sun and Of which overridden.
Click Download CSV to save the per-door figures, with a totals row, as a spreadsheet.
Issued codes
Click the Issued codes icon to see every code the campaign has handed out. Use Search to filter by email address or code.
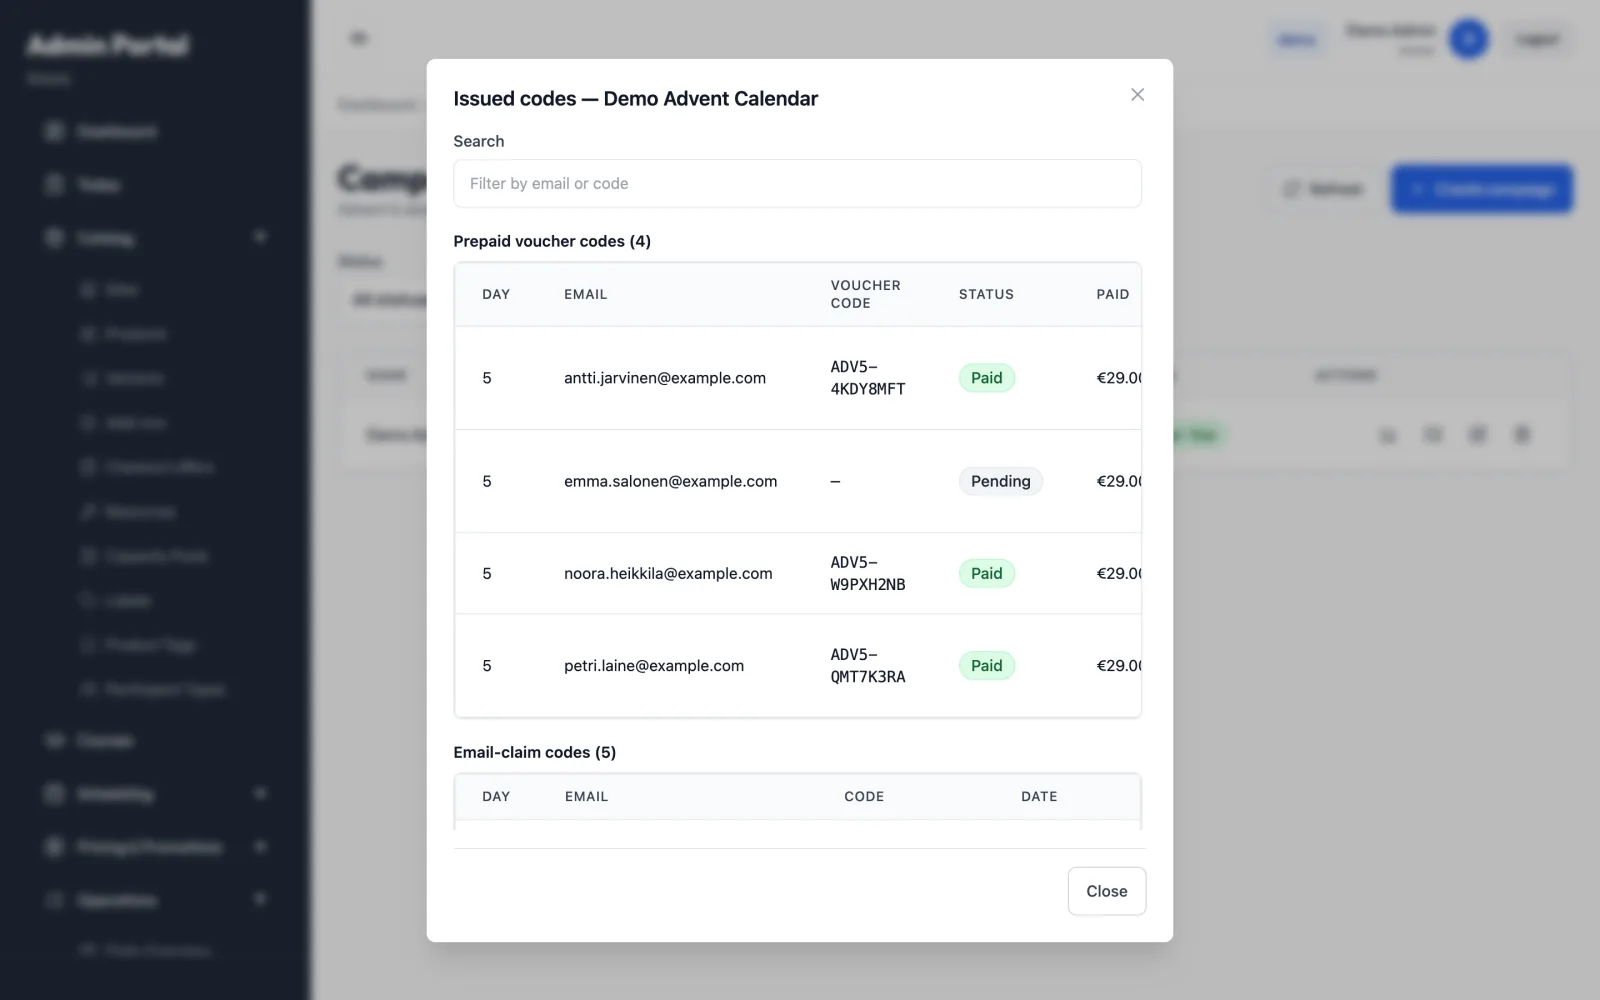
- Prepaid voucher codes: one row per purchase, with the Day, buyer Email, Voucher code, payment Status (Paid, Pending, Failed or Cancelled) and the amount Paid. A purchase that isn't paid yet shows "No code yet".
- Gift card door sales: one row per gift card bought from a door, with the Day, buyer Email, Recipient, Gift card code, Bonus code, payment Status and the amount Paid.
- Email-claim codes: one row per claim, with the Day, Email, Code and Date.
When the campaign has the marketing opt-in, the Marketing column shows Opted in for customers who ticked the box.
This is the place to look when a customer says they lost their code.
Download the codes
Click Download CSV to save every issued code, from all three door types, as one spreadsheet. Use it for following up. Each row has the door type (email_claim, prepaid or gift_card), day, email, recipient email, code, bonus code, status, amount, created and refunded times, and the opt-in columns: Marketing opt-in, Consent version, Cities, Interests and Frequency. Several cities or interests are separated with |, for example Helsinki|Pori.
The file opens directly in Excel: it uses ; between columns and keeps ä and ö intact. It contains customers' email addresses, so store and share it with care, and delete it when you no longer need it.
Codes at the counter
Walk-in guests can use their calendar codes at the counter too:
- Claimed discount codes (for example
ADV5-…): enter them in Quick walk-in under + Discount code. The same rules apply as online (product, dates, weekdays, minimum spend, one use). Redeem voucher doesn't take discount codes; it tells you to use Quick walk-in instead. - Prepaid vouchers and gift card bonuses: redeem them on the Redeem voucher page and choose the product the guest is using. A voucher for one product can't be redeemed for another. See Redeem at the front desk.
Delete or end a campaign
You can delete a campaign that nobody has used yet. Deleting also removes all its doors. If customers already hold codes from it, the delete is blocked, because those codes must keep working. In that case, switch Live off (or set the status to Ended) to take the calendar down.
Related
- Promotions: regular discount codes and automatic promotions
- Gift cards: gift cards sold all year round